<?xml version="1.0" encoding="utf-8"?>
<feed xmlns="http://www.w3.org/2005/Atom" xml:lang="zh_TW">
  <title>c8763yee&apos;s website</title>
  <subtitle>Linux Kernel, Memory Management &amp; Systems Notes</subtitle>
  <link href="https://c8763yee.github.io/" rel="alternate" type="text/html"/>
  <link href="https://c8763yee.github.io/atom.xml" rel="self" type="application/atom+xml"/>
  <id>https://c8763yee.github.io/</id>
  <updated>2026-08-09T00:00:00.000Z</updated>
  <entry>
    <title>COSCUP 2026: from COMPUTER to COMPUTing centER: The history of linux memory management</title>
    <link href="https://c8763yee.github.io/posts/from-computer-to-computing-center-the-history-of-linux-memory-management/" rel="alternate" type="text/html"/>
    <id>https://c8763yee.github.io/posts/from-computer-to-computing-center-the-history-of-linux-memory-management/</id>
    <published>2026-08-09T00:00:00.000Z</published>
    <updated>2026-08-09T00:00:00.000Z</updated>
    <summary>How Linux memory management evolved from page tables and reverse mapping to page reclaim and MGLRU for modern data-center workloads.</summary>
    <content type="html"><![CDATA[<p><a href="https://c8763yee.github.io/posts/%E5%BE%9E%E5%80%8B%E4%BA%BA%E9%9B%BB%E8%85%A6%E5%88%B0%E8%B3%87%E6%96%99%E4%B8%AD%E5%BF%83linux-%E8%A8%98%E6%86%B6%E9%AB%94%E7%AE%A1%E7%90%86%E6%BC%94%E5%8C%96/">Mandarin version</a></p>
<h2>Background</h2>
<p>Data centers: reclaim is a routinely running mechanism</p>
<ul>
<li>Memory overcommit is part of the business model. Physical memory is one of the most expensive components in a server; idle RAM is money burned. The total memory allocated to virtual machines exceeds physical capacity, hedged by reclaim and swap (or zram/zswap, far memory).</li>
<li>Thousands of processes on a single machine is the norm: fork-based servers (Apache prefork, PostgreSQL, early CGI), KVM, containers, one process tree per tenant. cgroups set memory.max for each tenant, and memcg reclaim is running all the time.</li>
<li>Proactive reclaim: rather than waiting until direct reclaim stalls the system, continuously squeeze cold pages out during normal operation (memory.reclaim, kswapd/MGLRU-style background aging).</li>
</ul>
<p>So the question arises: how exactly does the operating system find these pages? Or more precisely, before reclaiming a page, the system needs to know:</p>
<ol>
<li>Has this page been used recently?</li>
<li>Which processes are still using it?</li>
</ol>
<h2>Forward Page Walk</h2>
<p>When a task accesses a virtual address, the MMU queries the TLB. On a TLB miss, the hardware page walker walks the page table on its own and fills in the TLB entry. Only when the walker cannot find an entry, or on a permission violation, does the CPU raise a #PF exception (x86 IDT vector 14, with the faulting VA stored in CR2) and enter the kernel's page fault path. If the page requires operating on a storage device (e.g., swap-in, or first-time read of a file-backed page/folio), it is a major fault; otherwise it remains a minor fault.</p>
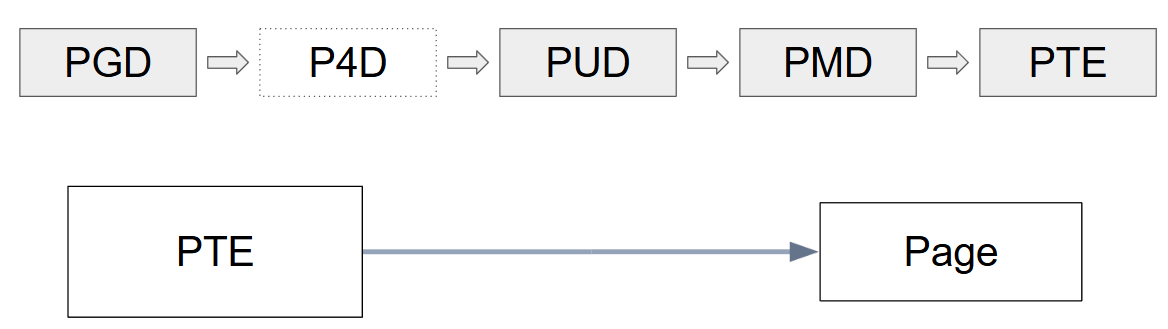
<p>On the kernel side, entry is via <code>__handle_mm_fault()</code>, which performs a level-by-level walk of five levels — PGD -&gt; P4D -&gt; PUD -&gt; PMD -&gt; PTE (when 5-level paging is not enabled, P4D is folded and it is effectively four levels). At each level, if the entry does not exist, the next-level page table is allocated as needed via <code>pud_alloc()</code>, <code>pmd_alloc()</code>, etc., and the corresponding link is established.</p>
<p><img src="https://hackmd.io/_uploads/BkZFRH2IGe.png" alt="image" /></p>
<h2>RMAP (Reverse Walk)</h2>
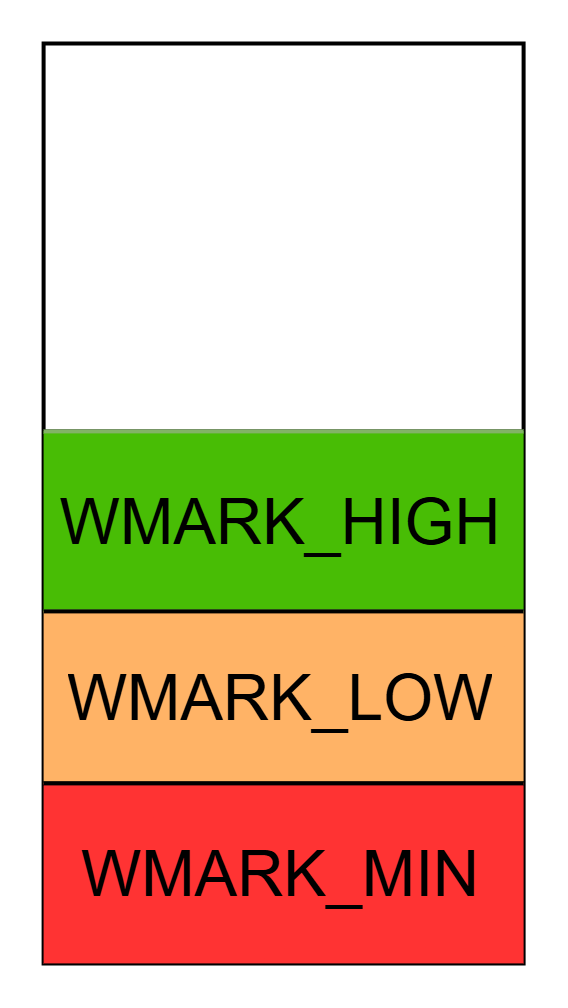
<p>When available memory drops below the low watermark (<code>WMARK_LOW</code>), <code>kswapd</code> is woken up to perform asynchronous page reclaim in the background; when it drops below <code>WMARK_MIN</code>, direct reclaim is triggered and executed synchronously.</p>
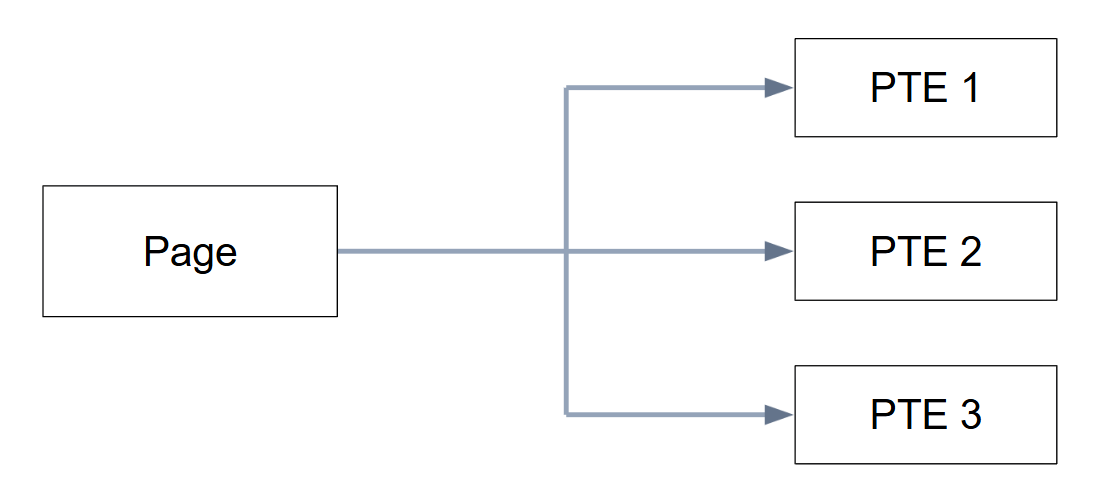
<p>During page reclaim, the Linux kernel picks candidate pages/folios off the LRU list for reclaim and checks the hotness of each page/folio. After confirming it is a cold page, it then checks which virtual memory (the <code>pte_t</code> pointed to by the <code>mm_struct</code> of each task) maps this page/folio, along with the page/folio hotness (based on the Accessed bit), and clears the PTE mappings as appropriate. Only then can it safely write an anon page/folio to swap, or directly drop / write back a file-backed page/folio.</p>
<p><img src="https://hackmd.io/_uploads/rJ3FCSnIGe.png" alt="image" /></p>
<h3>How would RMAP be implemented without RMAP metadata?</h3>
<p>So the question arises: how do we know which virtual memory maps this page? Without any auxiliary data structure, the only option is to scan all tasks' mappings to find the PTE access state (Accessed bit) corresponding to the target page/folio, and reclaim the page/folio to swap when no task maps it.</p>
<p>This brings two problems:</p>
<ul>
<li>The cost is proportional to the "total number of PTEs in the system," not to the "number of pages that need to be reclaimed." Scanning large numbers of page tables that map hot pages is pure waste.</li>
<li>A page shared by multiple processes can only truly be reclaimed after all of its mappings have been torn down in their respective scans. The kernel cannot proactively pick a page and tear down all of its mappings at once, and the Accessed bit (page hotness) is scattered across various page tables and cannot be aggregated for a single page.</li>
</ul>
<p>Take reclaim before Linux v2.4 as an example. <code>swap_out()</code> would start walking from <code>init_mm</code>, linearly scanning its page tables to see which PTE points to a page whose mapping can be torn down.</p>
<h2>The Evolution of RMAP in Linux</h2>
<ul>
<li>per-page (pte_chain): 2.5.27 ~ 2.6.6</li>
<li>per-object (anon_vma): 2.6.7 ~ 2.6.33</li>
<li>anon_vma_chain: 2.6.34 ~</li>
</ul>
<p>Since anon_vma_chain, the RMAP structure has remained largely fixed, with only partial changes to implementation and architecture.</p>
<h3>per-page RMAP (pte_chain)</h3>
<p>Since the problem is "there is no way to find all the PTEs mapped to a page from the page itself," the simplest approach is to record all the corresponding PTEs directly on the page. With this in mind, Rik van Riel proposed RMAP in <code>2.4.17-rmap-12e</code>. The concrete implementation adds a <code>pte_chain</code> field to the <code>struct page</code> data structure, pointing to a linked list that chains together the addresses of all corresponding PTEs. During reclaim, one only needs to walk this linked list and check the Accessed bit, instead of walking every PTE in the entire system as before. The patch was merged into mainline in 2.5.27.</p>
<pre><code>digraph pte_chain {
 rankdir=LR;
 bgcolor="transparent";
 nodesep=0.6;
 ranksep=0.9;
 node [shape=record, fontname="Courier New", fontsize=12,
 color="#555555", fontcolor="#333333", margin="0.16,0.06"];
 edge [color="#555555", arrowsize=0.8];

 subgraph cluster_page {
 color="transparent";
 fontname="Courier New";
 fontcolor="#333333";
 label="struct page";
 page [width=1.9, label="...\n\n\n...|&lt;chain&gt; pte.chain|...\n\n\n..."];
 }

 subgraph cluster_pc1 {
 color="transparent";
 fontname="Courier New";
 fontcolor="#333333";
 label="struct pte_chain";
 pc1 [width=1.9, label="&lt;next&gt; next_and_idx|ptes[0]|...|ptes[NRPTE-1]"];
 }

 subgraph cluster_pc2 {
 color="transparent";
 fontname="Courier New";
 fontcolor="#333333";
 label="struct pte_chain";
 pc2 [width=1.9, label="&lt;next&gt; next_and_idx|ptes[0]|...|ptes[NRPTE-1]"];
 }

 tail [shape=plaintext, fontname="Courier New", label=". . ."];

 page:chain -&gt; pc1:next;
 pc1:next -&gt; pc2:next;
 pc2:next -&gt; tail;
}
</code></pre>
<pre><code>#define NRPTE ((L1_CACHE_BYTES - sizeof(unsigned long))/sizeof(pte_addr_t))

// NRPTE = 7 when L1_CACHE_BYTES = 64
// 3 when L1_CACHE_BYTES = 32

struct page {
 ...
 struct pte_chain *pte_chain; /* points to all PTEs mapping this page */
 ...
};

struct pte_chain {
 unsigned long next_and_idx;
 pte_addr_t ptes[NRPTE];
} ____cacheline_aligned;

pte_chain_encode(pte_chain, idx): return (unsigned long)pte_chain | idx;
pte_chain_next(pc): return (struct pte_chain *)(pc-&gt;next_and_idx &amp; ~NRPTE);
pte_chain_idx(pc): return pc-&gt;next_and_idx &amp; NRPTE;

page_add_rmap(page, ptep);
page_remove_rmap(page, ptep);
</code></pre>
<p>In the pte_chain era there was no VMA-level insertion or removal at all. The unit of record was the PTE.</p>
<pre><code>page_add_rmap(page, ptep); /* on page fault, link the pte address onto the page */
page_remove_rmap(page, ptep); /* on unmap, linearly scan to find and remove it */
</code></pre>
<p><code>fork()</code>: <code>copy_page_range()</code> walks the PTEs one by one, calling <code>page_add_rmap()</code> once for each mapped page. Cost is O(number of pages), and memory is O(number of mappings).
<code>munmap() / exit()</code>: <code>zap_pte_range()</code> calls <code>page_remove_rmap()</code> one by one, and removal requires a linear scan of the pte_chain to find the matching entry.</p>
<h3>From per-page to per-object RMAP (anon_vma)</h3>
<p>However, this design still had problems. As the number of sharing tasks grows, the length of the <code>pte_chain</code> linked list grows too, and the time complexity of the whole walk is $O(N)\text{, where N is the length of the pte_chain linked list}$.
In addition, the memory overhead brought by <code>pte_chain</code> is proportional to the system's own memory size. Since <code>pte_chain</code> requires at least 12 extra bytes, even on a 32-bit system with just 128MB of RAM, the memory overhead of <code>pte_chain</code> amounts to 400KB.</p>
<p>Given the memory overhead of <code>pte_chain</code>, community acceptance was low, and the community began discussing how to eliminate the <code>pte_chain</code> memory overhead. For file-backed pages, the PTEs in use can be found in reverse via <code>address-&gt;i_mmap</code>; anon pages, however, had no similar data structure — hence <code>anon_vma</code> was born.</p>
<p>:::info
The difference between anon pages and file-backed pages lies mainly in the page's origin and how it is handled after reclaim.
For a file-backed page, its source is a file on a storage device (HDD, SSD, etc.). After being reclaimed, the kernel checks whether the page has been modified (dirty page) to decide whether to drop it directly or write the dirty page back to the storage device before dropping it <a href="https://docs.kernel.org/admin-guide/device-mapper/cache.html#cache-operating-modes">(Linux's default dirty cache behavior is writeback)</a>
:::</p>
<p>In <code>2.6.7</code>, RMAP changed from the original per-page <code>pte_chain</code> chaining to having anon and file-backed pages share the <code>mapping</code> field, where file-backed pages store an <code>address_space</code> and anon pages store an <code>anon_vma</code>, using the LSB of the pointer to determine which is actually stored.</p>
<pre><code>struct page {
 ...
 struct address_space *mapping;
 ...
};
</code></pre>
<p><code>anon_vma</code> uses a linked list to chain together the VMAs that belong to it, and multiple pages map to the same <code>anon_vma</code>. On unmap, the page offset is computed from <code>page-&gt;index</code>, then each VMA in the <code>anon_vma</code> is walked; the page offset is added to the VMA's start address to determine whether the VMA is related to the page, and to find the corresponding PTE.</p>
<pre><code>struct anon_vma {
 spinlock_t lock;
 struct list_head head; /* chains vma-&gt;anon_vma_node */
};
</code></pre>
<ul>
<li>Insertion (page fault): anon_vma_prepare(vma). First, find_mergeable_anon_vma() attempts to reuse the anon_vma of an adjacent mergeable VMA; only if none is found is a new one allocated, and finally list_add(&amp;vma-&gt;anon_vma_node, &amp;anon_vma-&gt;head).</li>
<li>Insertion (fork): anon_vma_link(vma). The child process directly reuses the parent's anon_vma, hanging its own node onto the same list.</li>
<li>Insertion (VMA split): the new VMA produced by split_vma() shares the same anon_vma, likewise via anon_vma_link().</li>
<li>Removal: anon_vma_unlink(vma) — after list_del(), check whether the list is empty; if so, free the anon_vma.</li>
</ul>
<pre><code>digraph anon_vma {
 rankdir=LR;
 bgcolor="transparent";
 nodesep=0.5;
 ranksep=1.0;
 node [shape=record, fontname="Courier New", fontsize=11,
 color="#555555", fontcolor="#333333", margin="0.16,0.06"];
 edge [fontname="Courier New", fontsize=10, arrowsize=0.7];

 subgraph cluster_page {
 color="transparent"; fontname="Courier New"; fontcolor="#333333";
 label="struct page";
 page [width=2.1, label="...\n\n...|&lt;map&gt; mapping|...\n\n..."];
 }

 subgraph cluster_av {
 color="transparent"; fontname="Courier New"; fontcolor="#333333";
 label="struct anon_vma";
 av [width=2.1, label="&lt;lock&gt; lock|&lt;head&gt; head"];
 }

 subgraph cluster_vp {
 color="transparent"; fontname="Courier New"; fontcolor="#333333";
 label="vm_area_struct (parent)";
 vma_p [width=2.1, label="vm_start / vm_end|&lt;avn&gt; anon_vma_node|&lt;av&gt; anon_vma"];
 }
 subgraph cluster_vc {
 color="transparent"; fontname="Courier New"; fontcolor="#333333";
 label="vm_area_struct (child)";
 vma_c [width=2.1, label="vm_start / vm_end|&lt;avn&gt; anon_vma_node|&lt;av&gt; anon_vma"];
 }
 subgraph cluster_vs {
 color="transparent"; fontname="Courier New"; fontcolor="#333333";
 label="vm_area_struct (split)";
 vma_s [width=2.1, label="vm_start / vm_end|&lt;avn&gt; anon_vma_node|&lt;av&gt; anon_vma"];
 }

 /* page-&gt;mapping: the low bit PAGE_MAPPING_ANON marks that this is not an address_space */
 edge [color="#a15c00", style=solid, penwidth=1.2, constraint=true];
 page:map -&gt; av:lock [label=" | PAGE_MAPPING_ANON"];

 /* anon_vma-&gt;head: a single list chaining all related VMAs */
 edge [color="#333333", style=solid, penwidth=1.3, constraint=true];
 av:head -&gt; vma_p:avn;
 vma_p:avn -&gt; vma_c:avn;
 vma_c:avn -&gt; vma_s:avn;
 edge [style=dashed, penwidth=1.0, constraint=false];
 vma_s:avn -&gt; av:head;

 /* back-pointers of the VMAs */
 edge [color="#999999", style=dotted, penwidth=1.0, constraint=false];
 vma_p:av -&gt; av;
 vma_c:av -&gt; av;
 vma_s:av -&gt; av;
}

</code></pre>
<h3>From anon_vma to anon_vma_chain</h3>
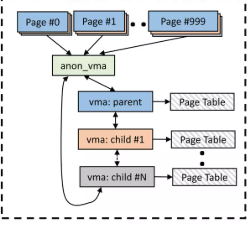
<p>The anon_vma introduced in 2004 solved the memory overhead of pte_chain, but its handling of fork() was too crude: a child process's VMA was hung directly onto the parent's anon_vma, so the entire process family shared a single anon_vma.
<img src="https://hackmd.io/_uploads/BkWjJ8_ezl.png" alt="image" /></p>
<p>Before object rmap was merged in 2003, Andrew Morton raised concerns about this mechanism. The object rmap design walks all VMAs associated with an entire object (such as an anon_vma or address_space), which inevitably visits VMAs completely unrelated to the page being reclaimed, spending a large amount of time on the walk. In contrast, pte_chain only needs to walk the PTEs relevant to the page. He also illustrated the problem with an extreme case: with 1000 tasks using the same file, where each task has 1000 VMAs on that file, there are 1 million VMAs in total, and on unmap all 1 million VMAs must be walked no matter what. Although he only mentioned file-backed pages, since this is a problem of the design itself, anon pages could suffer the same problem.</p>
<p>Notably, Andrew himself at the time leaned toward this being merely "theoretically possible" and not a big deal — after all, the 2.4 virtual scan design had the same problem and nobody had hit it. Seven years later, however, what Andrew Morton worried about did happen.</p>
<blockquote>
<p>Without the anon_vma changes, when AIM7 hits around 9.7k
users (on a test box with 16GB RAM and not quite enough IO),
the system ends up running &gt;99% in system time, with every
CPU on the same anon_vma lock in the pageout code.</p>
</blockquote>
<p>Rik van Riel found that the AIM7 benchmark seized up when the user count reached 9.7k, with most of the time spent contending for the anon_vma lock — confirming the walking-time problem described above.</p>
<p>In response, Rik van Riel proposed a patch addressing this. The concrete idea is to create an <code>anon_vma</code> per process and use the <code>anon_vma_chain</code> data structure to link anon_vmas and VMAs, then use same_vma and <code>same_anon_vma</code> to chain together the AVCs that map to the same "<code>vma</code> or <code>anon_vma</code>," forming a many-to-many association.</p>
<p>After applying this patch, AIM7 only began to seize up at 29.7k users, and the bottleneck shifted to I/O wait.</p>
<pre><code>struct anon_vma_chain {
 struct vm_area_struct *vma;
 struct anon_vma *anon_vma;
 struct list_head same_vma; // all avcs that linked by same vma
 struct list_head same_anon_vma; // all avcs that linked by same anon_vma
};
</code></pre>
<p>Corresponding kernel commit/patch:</p>
<ul>
<li><code>5beb49305251</code> (<code>mm: change anon_vma linking to fix multi-process server scalability issue</code>).</li>
</ul>
<h3>anon_vma_chain interval tree</h3>
<p>The same_anon_vma linked list was replaced with an interval tree (implemented as an augmented rbtree), keyed by the interval $[\text{vm_pgoff}, \text{vm_pgoff} + \text{vma_pages})$ covered by each VMA. The RMAP walk becomes a stabbing query on the target pgoff, returning only the VMAs whose interval actually covers that pgoff, with complexity O(log n + number of hits). In the same merge window, the long-standing prio_tree on the file-backed side was also replaced by the same interval tree (6b2dbba8b6ac); anon and file reverse walks have shared the same index structure ever since — which is where today's <code>anon_vma_interval_tree_foreach()</code> and <code>vma_interval_tree_foreach()</code> macros come from.</p>
<pre><code>struct anon_vma_chain {
 struct vm_area_struct *vma;
 struct anon_vma *anon_vma;
 struct list_head same_vma; /* locked by mmap_lock &amp; page_table_lock */
 struct rb_node rb; /* locked by anon_vma-&gt;rwsem */
 unsigned long rb_subtree_last;
#ifdef CONFIG_DEBUG_VM_RB
 unsigned long cached_vma_start, cached_vma_last;
#endif
};
</code></pre>
<p>During an RMAP walk, the anon_vma is first obtained from page-&gt;mapping, then the anon_vma_chain interval tree is walked continuously from anon_vma-&gt;rb_root, checking each corresponding VMA's vm_start and vm_end to determine whether the PTE corresponding to that VMA maps this page.</p>
<p>Corresponding kernel commit:</p>
<ul>
<li><code>bf181b9f9d8d</code> (<code>mm anon rmap: replace same_anon_vma linked list with an interval tree</code>)</li>
</ul>
<pre><code>digraph anon_vma_chain {
 rankdir=LR;
 bgcolor="transparent";
 nodesep=0.5;
 ranksep=1.0;
 node [shape=record, fontname="Courier New", fontsize=11,
 color="#555555", fontcolor="#333333", margin="0.16,0.06"];
 edge [fontname="Courier New", fontsize=10, arrowsize=0.7];

 subgraph cluster_vp {
 color="transparent"; fontname="Courier New"; fontcolor="#333333";
 label="vm_area_struct (parent)";
 vma_p [width=2.3, label="vm_start / vm_end|&lt;avc&gt; anon_vma_chain|&lt;av&gt; anon_vma"];
 }
 subgraph cluster_vc {
 color="transparent"; fontname="Courier New"; fontcolor="#333333";
 label="vm_area_struct (child)";
 vma_c [width=2.3, label="vm_start / vm_end|&lt;avc&gt; anon_vma_chain|&lt;av&gt; anon_vma"];
 }

 subgraph cluster_ap1 {
 color="transparent"; fontname="Courier New"; fontcolor="#333333";
 label="anon_vma_chain";
 avc_p1 [width=2.3, label="&lt;vma&gt; vma|&lt;av&gt; anon_vma|&lt;sv&gt; same_vma|&lt;rb&gt; rb|rb_subtree_last"];
 }
 subgraph cluster_ac1 {
 color="transparent"; fontname="Courier New"; fontcolor="#333333";
 label="anon_vma_chain";
 avc_c1 [width=2.3, label="&lt;vma&gt; vma|&lt;av&gt; anon_vma|&lt;sv&gt; same_vma|&lt;rb&gt; rb|rb_subtree_last"];
 }
 subgraph cluster_ac2 {
 color="transparent"; fontname="Courier New"; fontcolor="#333333";
 label="anon_vma_chain";
 avc_c2 [width=2.3, label="&lt;vma&gt; vma|&lt;av&gt; anon_vma|&lt;sv&gt; same_vma|&lt;rb&gt; rb|rb_subtree_last"];
 }

 subgraph cluster_ava {
 color="transparent"; fontname="Courier New"; fontcolor="#333333";
 label="anon_vma A";
 av_a [width=2.3, label="&lt;root&gt; root|&lt;parent&gt; parent|num_children|num_active_vmas|&lt;rb&gt; rb_root"];
 }
 subgraph cluster_avb {
 color="transparent"; fontname="Courier New"; fontcolor="#333333";
 label="anon_vma B";
 av_b [width=2.3, label="&lt;root&gt; root|&lt;parent&gt; parent|num_children|num_active_vmas|&lt;rb&gt; rb_root"];
 }

 av_a -&gt; av_b [style=invis];

 /* same_vma: from the VMA's view, "which anon_vmas do I need to take care of" */
 edge [color="#333333", style=solid, penwidth=1.3, constraint=true, dir=forward];
 vma_p:avc -&gt; avc_p1:sv;
 vma_c:avc -&gt; avc_c1:sv;
 avc_c1:sv -&gt; avc_c2:sv;

 /* rb: from the anon_vma's view, "which VMAs cover me" (interval tree) */
 edge [color="#1f6feb", style=dashed, penwidth=1.2, dir=back, constraint=false];
 avc_p1:rb -&gt; av_a:rb;
 avc_c1:rb -&gt; av_a:rb;
 avc_c2:rb -&gt; av_b:rb;

 /* the AVC's own two pointers */
 edge [color="#999999", style=dotted, penwidth=1.0, dir=back, constraint=true];
 vma_p -&gt; avc_p1:vma;
 vma_c -&gt; avc_c1:vma;
 vma_c -&gt; avc_c2:vma;
 edge [dir=forward, constraint=true];
 avc_p1:av -&gt; av_a;
 avc_c1:av -&gt; av_a;
 avc_c2:av -&gt; av_b;

 /* the VMA's own -&gt;anon_vma: new pages hang here */
 edge [color="#a15c00", style=solid, penwidth=1.1, constraint=false];
 vma_p:av -&gt; av_a:root;
 vma_c:av -&gt; av_b:root;

 /* anon_vma tree */
 edge [color="#999999", style=dotted, penwidth=1.0, constraint=false];
 av_b:parent -&gt; av_a:root [label=" parent / root"];
}
</code></pre>
<h2>How RMAP Relates to the Current Page Reclaim Implementation</h2>
<p>When major fault handling finds that the amount of available pages has fallen below a certain level, the page reclaim mechanism kicks in: <code>kswapd</code> is triggered when available memory falls below <code>WMARK_LOW</code>, or direct reclaim is performed by the page fault handler itself when available memory falls below <code>WMARK_MIN</code>. During reclaim, victims are selected for reclaim from cold data first, according to the LRU tier the page belongs to.</p>
<p>Both direct reclaim and kswapd eventually call into <code>shrink_node()</code></p>
<pre><code># background reclaim
kswapd -&gt; balance_pgdat -&gt; shrink_node -&gt; shrink_lruvec
 -&gt; shrink_folio_list -&gt; {folio_referenced, try_to_unmap} -&gt; __rmap_walk_file ...

# direct reclaim
__alloc_pages -&gt; __alloc_pages_slowpath -&gt; try_to_free_pages
 -&gt; shrink_node -&gt; shrink_lruvec -&gt; ...
</code></pre>
<h3>Observing How the Active/Inactive Lists Use RMAP</h3>
<p><img src="https://hackmd.io/_uploads/HJCafU2UGl.png" alt="image" /></p>
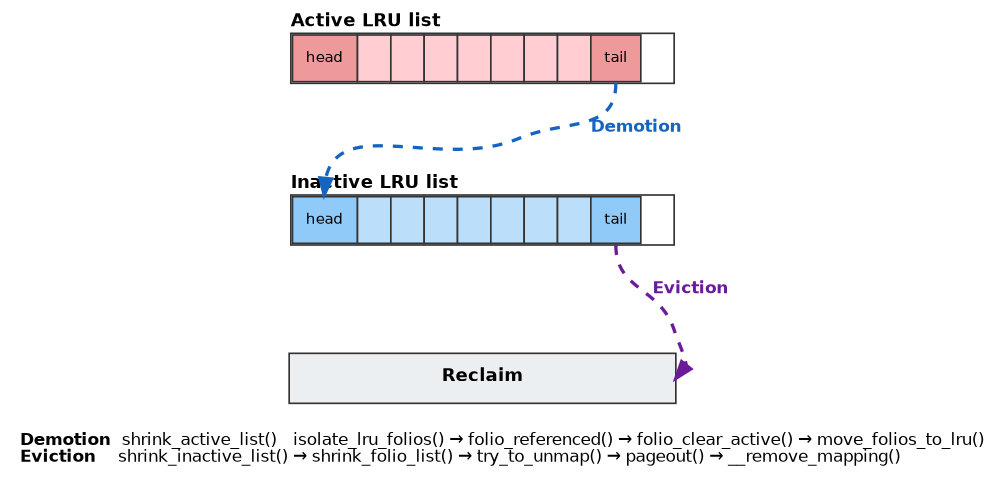
<p>Access detection in the traditional Active/Inactive lists is built entirely on RMAP. The kernel cannot be notified at the moment the hardware sets the Accessed bit; it can only poll after the fact: folio_referenced() performs one RMAP walk over the folio, checking and clearing the Accessed bit of every mapping PTE one by one, returning "how many VMAs have accessed it since the last check."</p>
<p>Concretely, two paths perform RMAP walks:</p>
<ol>
<li>Demotion: check whether the folio at the tail of the Active LRU list has been accessed; if not, move it to the inactive list.</li>
<li>Eviction: check whether the folio at the tail of the Inactive LRU list has been accessed; if not, drop the folio; otherwise move it back to the Inactive list.</li>
</ol>
<p>Taking <code>kswapd</code> as an example, its call path into RMAP is:</p>
<pre><code>kswapd -&gt; balance_pgdat -&gt; shrink_node -&gt; shrink_lruvec
 ├── shrink_active_list
 │ └── folio_referenced -&gt; __rmap_walk_file
 │ ├── folio_referenced_one -&gt; page_vma_mapped_walk
 │ └── vma_interval_tree_iter_first
 └── shrink_folio_list
 ├── folio_referenced -&gt; __rmap_walk_file -&gt; folio_referenced_one
 │ └── page_vma_mapped_walk
 └── try_to_unmap -&gt; __rmap_walk_file -&gt; try_to_unmap_one
 └── set_tlb_ubc_flush_pending
</code></pre>
<h3>How MGLRU Reduces RMAP Overhead</h3>
<h4>Architectural Improvements</h4>
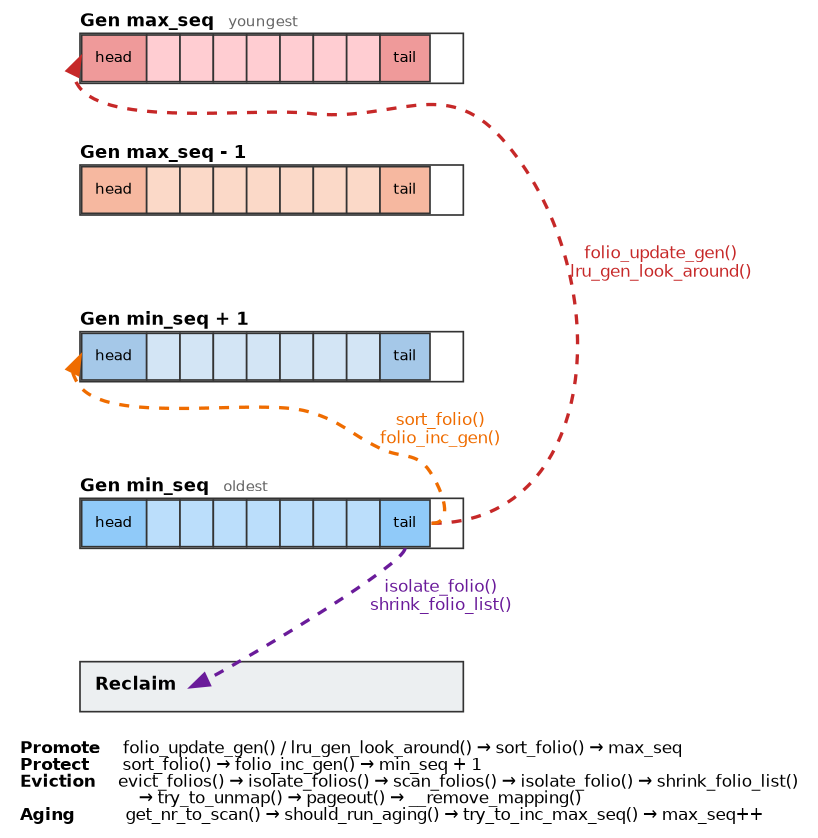
<p>First, at the architectural level, the Active/Inactive lists must operate on both the active and inactive LRU lists during eviction, whereas MGLRU — thanks to the natural aging property of its generations — only needs to operate on the oldest generation (min_seq) during eviction.</p>
<p><img src="https://hackmd.io/_uploads/SkX_XU3UMg.png" alt="mglru_list" /></p>
<pre><code>kswapd -&gt; balance_pgdat -&gt; kswapd_shrink_node -&gt; shrink_node
└── lru_gen_shrink_node
 └── shrink_one (global) / shrink_many -&gt; shrink_one (memcg)
 └── try_to_shrink_lruvec -&gt; evict_folios
 └── shrink_folio_list
 ├── folio_check_references -&gt; folio_referenced
 │ └── rmap_walk -&gt; rmap_walk_anon / rmap_walk_file
 │ └── folio_referenced_one
 │ └── page_vma_mapped_walk # all fixed costs are paid in full before this point
 │ └── lru_gen_look_around # a 64-PTE window with near-zero marginal cost
 │ ├── get_pte_pfn / get_pfn_folio
 │ ├── walk_update_folio # promote neighbors in place
 │ └── update_bloom_filter # feed back to aging
 └── try_to_unmap -&gt; rmap_walk -&gt; try_to_unmap_one
</code></pre>
<p>Next, consider the cost structure of an RMAP walk. To check the Accessed bit of a single PTE, folio_referenced() must always pay: acquiring the VMA object lock, walking the interval tree, page_vma_mapped_walk() descending the page table level by level to locate the PTE, and acquiring the page table lock (PTL). Meanwhile, the LRU is organized by physical pages, and adjacent folios on the list come from different VMAs of different processes. Thus every walk is a set of lock and tree operations with zero cache reuse. High fixed cost, and none of it amortized — this is why page_vma_mapped_walk eats 18.47% of kswapd's CPU.</p>
<pre><code> patch1-6
 39.03% lzo1x_1_do_compress (real work)
 18.47% page_vma_mapped_walk (overhead)
 6.74% _raw_spin_unlock_irq
 3.97% do_raw_spin_lock
 2.49% ptep_clear_flush
 2.48% anon_vma_interval_tree_iter_first
 1.92% folio_referenced_one
 1.88% __zram_bvec_write
 1.48% memmove
 1.31% vma_interval_tree_iter_next

 patch1-7
 48.16% lzo1x_1_do_compress (real work)
 8.20% page_vma_mapped_walk (overhead)
 7.06% _raw_spin_unlock_irq
 2.92% ptep_clear_flush
 2.53% __zram_bvec_write
 2.11% do_raw_spin_lock
 2.02% memmove
 1.93% lru_gen_look_around
 1.56% free_unref_page_list
 1.40% memset
</code></pre>
<p>Hence <code>lru_gen_look_around()</code> exploits the spatial locality of memory to improve page reclaim and hot page identification. When <code>shrink_folio_list</code> finds a hot PTE (Accessed bit = 1), it draws a PMD scan window centered on that PTE address, searching a total of BITS_PER_LONG PTEs within it, checking whether the Accessed bits of these neighboring PTEs are also 1 (young), and when there are enough hot pages, adds the PMD to a Bloom filter to serve as auxiliary information during aging.</p>
<p>$$f(young, total) = young \times n \ge total$$
$n=clamp(cacheline\div sizeof(pte),2,8)$</p>
<p>Finally, the aging part. As mentioned above, when a PMD contains enough hot pages, it is added to the Bloom filter. When aging performs its page table walk, it first queries the Bloom filter for each PMD entry. If the PMD exists in the Bloom filter, it means the PMD's hot-page density is high enough that it is worth continuing to walk the PTEs inside and performing promote/protect.</p>
<h3>Reclaim Behavior</h3>
<p>![image](https://hackmd.io/_uploads/ryB_kL3Ifx.png =200x)</p>
<ul>
<li>cgroup memory.reclaim
<ul>
<li>Proactive, manually triggered</li>
<li><code>echo &lt;size&gt; &gt; /sys/fs/cgroup/&lt;cg-name&gt;/memory.reclaim</code></li>
</ul>
</li>
<li>direct reclaim
<ul>
<li>Reactive, triggered when available memory is extremely scarce (watermark below WMARK_MIN)</li>
<li>Executes synchronously; the memory watermark is checked on page fault</li>
<li>Stops once the watermark rises to WMARK_LOW</li>
</ul>
</li>
<li>kswapd
<ul>
<li>Triggered when the available memory watermark falls below WMARK_LOW</li>
<li>Runs in the background, stops at WMARK_HIGH</li>
</ul>
</li>
</ul>
<h2>How Cloud Companies Customize Reclaim Policies</h2>
<ul>
<li>Why? The kernel's reclaim policy mainly targets the general case. Cloud vendors found that it causes regressions under specific workloads, so they need to implement their own reclaim policies to meet their needs.</li>
</ul>
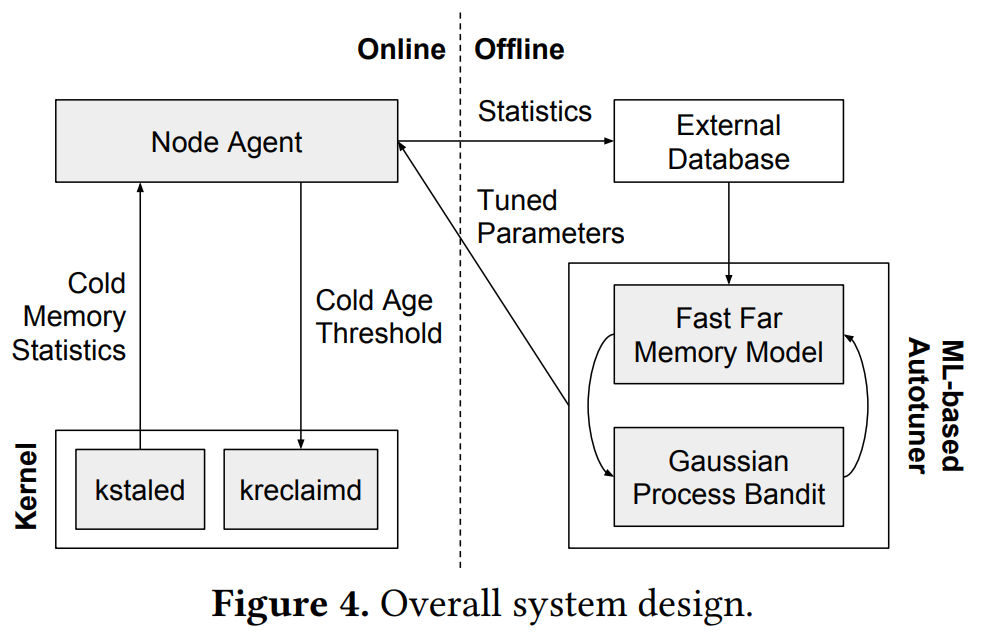
<h3>Google: kstaled / kreclaimd (ASPLOS 2019)</h3>
<p><img src="https://hackmd.io/_uploads/HkBg4IhIMx.png" alt="image" /></p>
<ul>
<li>kstaled: periodically walks page tables reading the pages' Accessed bits to track page age</li>
<li>kreclaimd: compresses pages whose age exceeds a threshold into zswap</li>
<li>Architectural evolution:
<ol>
<li>sysfs + bitmap</li>
<li>kstaled / kreclaimd</li>
</ol>
</li>
<li>Overhead grows linearly with memory size and scan frequency
<ul>
<li>kstaled scanning changed to a PMD linked-list walk (3.5x lower CPU usage)</li>
<li>kreclaimd changed to consume kstaled's data</li>
</ul>
</li>
</ul>
<h4>LSF MM 19</h4>
<p>Since this reclaim policy could not be handled in userspace, Shakeel Butt led a proposal at LSF MM 19 to push it upstream.</p>
<ul>
<li>Community remarks and questions
<ul>
<li>Rik van Riel: even if performance genuinely improves, scalability problems remain</li>
<li>Attendee: why not just use kswapd?</li>
</ul>
<blockquote>
<p>It "kind of works", he said, but is based on watermarks (keeping a certain percentage of memory free) rather than on idleness. kswapd also tries to balance memory usage across NUMA nodes, which is not useful in this setting. Finally, Butt said, kswapd is built on a large set of complicated heuristics, and he doesn't want to try to change them.</p>
</blockquote>
<ul>
<li>Johannes Weiner: why redo what the LRU list already does, at an outrageously higher cost?</li>
</ul>
<blockquote>
<p>Google was willing to pay that cost, which was less than having the system go into direct reclaim.</p>
</blockquote>
</li>
</ul>
<p>Community consensus: this kind of proactive reclaim is indeed useful to quite a few users, but the cost of this particular solution is too high to be worth considering for merging upstream.</p>
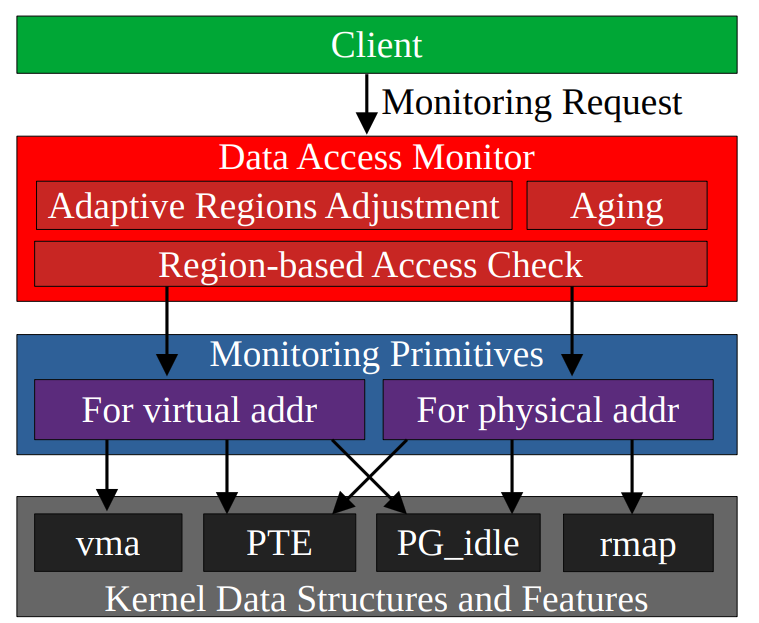
<h3>sjp38: DAMON/S (Data Access MONitoring[-based operation Schemes])</h3>
<ul>
<li>By SeongJae Park (sjp38), a former Amazon employee
<img src="https://hackmd.io/_uploads/BJqw4P3Lzg.png" alt="image" /></li>
<li>Region-based sampling
<ul>
<li>Changes the monitoring granularity from pages (as in Google's architecture above) to regions (region size is configurable)</li>
<li>Uses sampling to observe region hotness</li>
<li>Each sampling round randomly picks one page per region, waits one interval, then checks whether it was accessed; on a hit, the region's nr_accesses is incremented by 1.</li>
</ul>
</li>
<li>Adaptive Regions Adjustment
<ul>
<li>The premise is that pages within the same region have similar hotness, and access patterns change over time, so DAMON automatically merges and splits regions based on access frequency to continuously maintain this premise.</li>
</ul>
</li>
<li>Reclaim policies can be designed based on the observed information (DAMOS)
<ul>
<li>Example: DAMON_RECLAIM</li>
</ul>
</li>
</ul>
<h2>Conclusion</h2>
<ul>
<li>RMAP architectural improvements revolve around the cost of scanning page tables</li>
<li>MGLRU spreads the overall overhead of RMAP walking across its parts, trading a higher single RMAP walk cost for fewer RMAP walks</li>
</ul>
<hr />
<h1>Reference</h1>
<ul>
<li>https://lwn.net/Articles/23732/</li>
<li>https://web.archive.org/web/20141113083201/http://www.surriel.com:80/patches/2.4/2.4.17-rmap-12e</li>
<li>https://lwn.net/Articles/23742/</li>
<li>https://git.kernel.org/pub/scm/linux/kernel/git/torvalds/linux.git/commit/?id=5beb49305251</li>
<li>https://lore.kernel.org/lkml/20211019150731.16699-1-sj@kernel.org/</li>
<li>https://docs.kernel.org/admin-guide/mm/damon/</li>
<li>https://research.google/pubs/software-defined-far-memory-in-warehouse-scale-computers/</li>
<li>https://hackmd.io/@hank20010209/HyDVgwjyll</li>
<li>https://lore.kernel.org/lkml/Pine.LNX.4.44.0405182310200.3416-100000@localhost.localdomain/</li>
<li>https://lwn.net/Articles/787611/</li>
<li>https://static.sched.com/hosted_files/ossna2023/b0/damon_damos_damo_ossummit_na_2023.pdf</li>
</ul>
]]></content>
    <author><name>c8763yee</name></author>
    <category term="Conference"/>
  </entry>
  <entry>
    <title>COSCUP 2026: 從個人電腦到資料中心：Linux 記憶體管理演化</title>
    <link href="https://c8763yee.github.io/posts/%E5%BE%9E%E5%80%8B%E4%BA%BA%E9%9B%BB%E8%85%A6%E5%88%B0%E8%B3%87%E6%96%99%E4%B8%AD%E5%BF%83linux-%E8%A8%98%E6%86%B6%E9%AB%94%E7%AE%A1%E7%90%86%E6%BC%94%E5%8C%96/" rel="alternate" type="text/html"/>
    <id>https://c8763yee.github.io/posts/%E5%BE%9E%E5%80%8B%E4%BA%BA%E9%9B%BB%E8%85%A6%E5%88%B0%E8%B3%87%E6%96%99%E4%B8%AD%E5%BF%83linux-%E8%A8%98%E6%86%B6%E9%AB%94%E7%AE%A1%E7%90%86%E6%BC%94%E5%8C%96/</id>
    <published>2026-08-09T00:00:00.000Z</published>
    <updated>2026-08-09T00:00:00.000Z</updated>
    <summary>從 Page Table、RMAP、LRU 到 MGLRU，整理 Linux 記憶體管理與頁面回收機制如何演進，以因應資料中心的記憶體 overcommit 與現代工作負載。</summary>
    <content type="html"><![CDATA[<h2>背景說明</h2>
<p>資料中心：reclaim 是常態運轉的機制</p>
<ul>
<li>Memory overcommit 是商業模式的一部分。實體記憶體是伺服器最貴的元件之一，閒置的 RAM 就是燒掉的錢，配置給虛擬機器的記憶體總量超過實體容量，靠 reclaim 與 swap（或 zram/zswap、far memory）對沖。</li>
<li>單機上千個 process 是常態：fork-based server（Apache prefork、PostgreSQL、早期 CGI）、KVM、container、每個租戶一組 process tree。cgroup 對每個租戶設 memory.max，memcg reclaim 隨時在跑。</li>
<li>Proactive reclaim：與其等到 direct reclaim 卡住，不如平時就持續把 Cold page 擠出去（memory.reclaim、kswapd/MGLRU 式的背景老化）。</li>
</ul>
<p>那麼問題來了，作業系統到底要怎麼找到這些 Page？或者更精確地說，在回收 Page 之前系統需要知道：</p>
<ol>
<li>這個 Page 最近有沒有被使用？</li>
<li>現在還有哪些行程在用它？</li>
</ol>
<h2>正向走訪 Page</h2>
<p>Task 存取一個虛擬位址時由 MMU 查詢 TLB，TLB miss 時由硬體的 page walker 自行走訪 page table 補上 TLB entry。只有當 walker 找不到 Entry 或權限違規時，CPU 才觸發 #PF 例外（x86 IDT vector 14，CR2 存出錯 VA），進入核心的 page fault 路徑。若該頁需要操作儲存裝置（例如 swap-in 或首次讀入 File-back Page/Folio），則屬於 Major fault，否則仍為 Minor fault。</p>
<p>核心端由 <code>__handle_mm_fault()</code> 進入，完成 PGD -&gt; P4D -&gt; PUD -&gt; PMD -&gt; PTE 共五層（未啟用五層分頁時 P4D 折疊，實際為四層）的逐層走訪。每層若 entry 不存在則視情況以 <code>pud_alloc()</code>、<code>pmd_alloc()</code> 等配置下一層 page table 並建立對應關係。</p>
<p><img src="/images/screenshot/h9TKwHMEQ_-nkUGJqdVWdA-01-BkZFRH2IGe-47af4d26.png" alt="image" /></p>
<h2>RMAP (反向走訪)</h2>
<p>當可用記憶體低於 low watermark（<code>WMARK_LOW</code>）時 <code>kswapd</code> 被喚醒在背景進行非同步 Page reclaim，低於 <code>WMARK_MIN</code> 則觸發 Direct reclaim 同步執行。</p>
<p>Page reclaim 時 Linux 核心從 LRU List 上挑出候選 Page/Folio 回收與檢查這個 Page/Folio 熱度，確認是 Cold Page 後再檢查該 Page/Folio 被哪些虛擬記憶體（Task 所屬 <code>mm_struct</code> 指到的 <code>pte_t</code>）對應以及 Page/Folio 熱度（根據 Access bit），並視情況清除 PTE mapping。才能安全地把 Anon Page/Folio 寫入 swap 或 直接丟棄/Writeback File-back Page/Folio。</p>
<p><img src="/images/screenshot/h9TKwHMEQ_-nkUGJqdVWdA-02-rJ3FCSnIGe-9a57817a.png" alt="image" /></p>
<h3>沒有 RMAP metadata 的情況如何實現 RMAP？</h3>
<p>那麼問題來了，我們要怎麼知道這塊 Page 被哪些虛擬記憶體所對應？若沒有任何資料結構輔助，則只能藉由掃描所有 Task 的 mapping 來找到目標 Page/Folio 對應的 PTE 存取狀態 ( Accessed Bit )，並在沒有任何 Task 對應的時候將 Page/Folio 回收到 SWAP。</p>
<p>而這帶來以下兩個問題：</p>
<ul>
<li>成本與「系統上 PTE 總數」成正比，而不是與「需要回收的 Page 數」成正比。掃描大量映射著熱頁的頁表，是純粹的浪費。</li>
<li>被多個 process 共享的 Page 必須等到所有映射都在各自的掃描中被拆掉，才真正可回收。核心無法主動選定一個 Page 一次拆光它的映射，Accessed bit（Page 熱度）也散落在各個 Page table 中，無法針對單一 Page 彙整</li>
</ul>
<p>以 Linux v2.4 之前的 reclaim 為例。它會由 <code>swap_out()</code> 從 <code>init_mm</code> 開始走訪，線性掃描其 Page table，看哪個 PTE 指向的 Page 可以拆掉映射。</p>
<h2>Linux 的 RMAP 發展</h2>
<ul>
<li>per-page (pte_chain): 2.5.27 ~ 2.6.6</li>
<li>per-object (anon_vma): 2.6.7 ~ 2.6.33</li>
<li>anon_vma_chain: 2.6.34 ~</li>
</ul>
<p>從 anon_vma_chain 之後 RMAP 的結構就大致固定，只在部分實作與架構修改</p>
<h3>per-page RMAP（pte_chain）</h3>
<p>既然問題是「無法從 Page 找到所有 mapping 到該 Page 的 PTE」，那麼最簡單的方式就是直接在 Page 紀錄所有對應到的 PTE。有鑑於此，Rik van Riel 在 <code>2.4.17-rmap-12e</code> 時提出 RMAP，具體實作是在 <code>struct page</code> 這個資料結構上加入 <code>pte_chain</code> 欄位，其指向一條串起所有對應 PTE 位址的鏈結串列，這樣在 Reclaim 時只需要走訪這個鍊結串列並檢查 Accessed Bit。不用像之前走訪整個系統的所有 PTE 了，該 Patch 於 2.5.27 合併至主線。</p>
<pre><code>digraph pte_chain {
    rankdir=LR;
    bgcolor="transparent";
    nodesep=0.6;
    ranksep=0.9;
    node [shape=record, fontname="Courier New", fontsize=12,
          color="#555555", fontcolor="#333333", margin="0.16,0.06"];
    edge [color="#555555", arrowsize=0.8];

    subgraph cluster_page {
        color="transparent";
        fontname="Courier New";
        fontcolor="#333333";
        label="struct page";
        page [width=1.9, label="...\n\n\n...|&lt;chain&gt; pte.chain|...\n\n\n..."];
    }

    subgraph cluster_pc1 {
        color="transparent";
        fontname="Courier New";
        fontcolor="#333333";
        label="struct pte_chain";
        pc1 [width=1.9, label="&lt;next&gt; next_and_idx|ptes[0]|...|ptes[NRPTE-1]"];
    }

    subgraph cluster_pc2 {
        color="transparent";
        fontname="Courier New";
        fontcolor="#333333";
        label="struct pte_chain";
        pc2 [width=1.9, label="&lt;next&gt; next_and_idx|ptes[0]|...|ptes[NRPTE-1]"];
    }

    tail [shape=plaintext, fontname="Courier New", label=". . ."];

    page:chain -&gt; pc1:next;
    pc1:next  -&gt; pc2:next;
    pc2:next  -&gt; tail;
}
</code></pre>
<pre><code>#define NRPTE ((L1_CACHE_BYTES - sizeof(unsigned long))/sizeof(pte_addr_t))

// NRPTE = 7 when L1_CACHE_BYTES = 64
//         3 when L1_CACHE_BYTES = 32

struct page {
	...
	struct pte_chain *pte_chain;	/* 指向所有映射此頁的 PTE */
	...
};

struct pte_chain {
	unsigned long next_and_idx;
	pte_addr_t ptes[NRPTE];
} ____cacheline_aligned;

pte_chain_encode(pte_chain, idx):  return (unsigned long)pte_chain | idx;
pte_chain_next(pc):  return (struct pte_chain *)(pc-&gt;next_and_idx &amp; ~NRPTE);
pte_chain_idx(pc):   return pc-&gt;next_and_idx &amp; NRPTE;

page_add_rmap(page, ptep);
page_remove_rmap(page, ptep);
</code></pre>
<p>pte_chain 時期根本沒有 VMA 層級的插入與刪除。記錄單位是 PTE。</p>
<pre><code>page_add_rmap(page, ptep);     /* 缺頁處理時，把 pte 位址串上該 page */
page_remove_rmap(page, ptep);  /* unmap 時，線性掃描找到並移除 */
</code></pre>
<p><code>fork()</code>：<code>copy_page_range()</code> 逐一走訪 pte，對每個已映射的 page 呼叫一次 <code>page_add_rmap()</code>。成本 O(頁面數)，記憶體也是 O(映射數)。
<code>munmap() / exit()</code>：<code>zap_pte_range()</code> 逐一 <code>page_remove_rmap()</code>，且刪除時需線性掃描 pte_chain 找到匹配項。</p>
<h3>從 per-page 到 per-object 的 RMAP（anon_vma）</h3>
<p>然而這項設計還是有問題，隨著共用 task 數增長，<code>pte_chain</code> 鏈結串列的長度也會增長，整個走訪的時間複雜度為 $O(N)\text{，N 為 pte_chain 鍊結串列的長度}$。
除此之外，<code>pte_chain</code> 帶來的記憶體開銷與系統本身的記憶體大小成正比，由於 <code>pte_chain</code> 至少需要額外 12 Bytes 的空間，即使只是在配備 128MB RAM 的 32-bit 系統中，<code>pte_chain</code> 帶來的記憶體開銷也需要 400KB。</p>
<p>考慮 <code>pte_chain</code> 本身的記憶體開銷問題，社群接受度並不高，因此社群開始討論如何去除 <code>pte_chain</code> 記憶體開銷。對於 File-back page 可以從 <code>address-&gt;i_mmap</code> 反查使用的 PTE，然而 Anon page 沒有類似的資料結構，因此 <code>anon_vma</code> 出現了。</p>
<p>:::info
Anon page 與 File-back page 的差異主要在 page 來源與被回收後的處理方式。
對於 file-back page，其來源於儲存裝置（如 HDD、SSD 等）中的檔案。在被回收後會檢查 Page 是否被修改 (dirty page) 來決定是直接丟棄或是將 dirty page 寫回儲存裝置後才丟棄<a href="https://docs.kernel.org/admin-guide/device-mapper/cache.html#cache-operating-modes">（Linux 的 Dirty Cache 行為預設為 writeback）</a>
:::</p>
<p>在 <code>2.6.7</code> ，RMAP 從原本的由 Page 擴充 <code>pte_chain</code> 串連改為讓 Anon/File-back page 共用 <code>mapping</code> 欄位，其中 File-back page 放 <code>address_space</code>，Anon page 放 <code>anon_vma</code>，並透過該指標的 LSB 判斷具體存放內容。</p>
<pre><code>struct page {
	...
	struct address_space *mapping;
	...
};
</code></pre>
<p><code>anon_vma</code> 藉由鏈結串列將屬於自身的 vma 串連起來，多個 Page 會對應到同一個 <code>anon_vma</code>。unmap 時藉由 <code>page-&gt;index</code> 算出 page offset 後藉由走訪 <code>anon_vma</code> 中的每個 vma，將 page offset 與該 vma 的起始位址相加來判斷這個 vma 與 page 是否關聯，並找出其對應的 PTE。</p>
<pre><code>struct anon_vma {
	spinlock_t lock;
	struct list_head head;   /* 串接 vma-&gt;anon_vma_node */
};
</code></pre>
<ul>
<li>插入（Page fault）：anon_vma_prepare(vma)。先透過 find_mergeable_anon_vma() 嘗試沿用相鄰可合併 VMA 的 anon_vma，找不到才配置新的，最後 list_add(&amp;vma-&gt;anon_vma_node, &amp;anon_vma-&gt;head)。</li>
<li>插入（fork）：anon_vma_link(vma)。子行程直接沿用親代行程的 anon_vma，把自己的節點掛上同一條串列。</li>
<li>插入（vma 分裂）：split_vma() 產生的新 VMA 共用同一個 anon_vma，同樣 anon_vma_link()。</li>
<li>刪除：anon_vma_unlink(vma)，list_del() 後檢查串列是否已空，空了就釋放 anon_vma。</li>
</ul>
<pre><code>digraph anon_vma {
    rankdir=LR;
    bgcolor="transparent";
    nodesep=0.5;
    ranksep=1.0;
    node [shape=record, fontname="Courier New", fontsize=11,
          color="#555555", fontcolor="#333333", margin="0.16,0.06"];
    edge [fontname="Courier New", fontsize=10, arrowsize=0.7];

    subgraph cluster_page {
        color="transparent"; fontname="Courier New"; fontcolor="#333333";
        label="struct page";
        page [width=2.1, label="...\n\n...|&lt;map&gt; mapping|...\n\n..."];
    }

    subgraph cluster_av {
        color="transparent"; fontname="Courier New"; fontcolor="#333333";
        label="struct anon_vma";
        av [width=2.1, label="&lt;lock&gt; lock|&lt;head&gt; head"];
    }

    subgraph cluster_vp {
        color="transparent"; fontname="Courier New"; fontcolor="#333333";
        label="vm_area_struct (parent)";
        vma_p [width=2.1, label="vm_start / vm_end|&lt;avn&gt; anon_vma_node|&lt;av&gt; anon_vma"];
    }
    subgraph cluster_vc {
        color="transparent"; fontname="Courier New"; fontcolor="#333333";
        label="vm_area_struct (child)";
        vma_c [width=2.1, label="vm_start / vm_end|&lt;avn&gt; anon_vma_node|&lt;av&gt; anon_vma"];
    }
    subgraph cluster_vs {
        color="transparent"; fontname="Courier New"; fontcolor="#333333";
        label="vm_area_struct (split)";
        vma_s [width=2.1, label="vm_start / vm_end|&lt;avn&gt; anon_vma_node|&lt;av&gt; anon_vma"];
    }

    /* page-&gt;mapping：低位元 PAGE_MAPPING_ANON 標記這不是 address_space */
    edge [color="#a15c00", style=solid, penwidth=1.2, constraint=true];
    page:map -&gt; av:lock [label=" | PAGE_MAPPING_ANON"];

    /* anon_vma-&gt;head：單一 list，串起所有 related VMA */
    edge [color="#333333", style=solid, penwidth=1.3, constraint=true];
    av:head -&gt; vma_p:avn;
    vma_p:avn -&gt; vma_c:avn;
    vma_c:avn -&gt; vma_s:avn;
    edge [style=dashed, penwidth=1.0, constraint=false];
    vma_s:avn -&gt; av:head;

    /* VMA 的回指標 */
    edge [color="#999999", style=dotted, penwidth=1.0, constraint=false];
    vma_p:av -&gt; av;
    vma_c:av -&gt; av;
    vma_s:av -&gt; av;
}

</code></pre>
<h3>從 anon_vma 到 anon_vma_chain</h3>
<p>2004 年引入的 anon_vma 解決了 pte_chain 的記憶體開銷，但它對 fork() 的處理過於粗糙：子行程的 VMA 直接掛進親代行程的 anon_vma，整個行程家族共用同一個 anon_vma。
<img src="/images/screenshot/h9TKwHMEQ_-nkUGJqdVWdA-03-BkWjJ8_ezl-9be9e6b4.png" alt="image" /></p>
<p>Andrew morton 曾經在 2003 年 object rmap 被合併前針對該機制提出疑惑，object rmap 設計是走訪整個物件 (如 anon_vma 或 address_space) 上關聯的所有 vma，這時一定會走訪到完全無關於要回收 Page 的 vma，並且花費大量時間在走訪動作。反而是 pte_chain 只需要針對 page 相關的 pte 走訪即可。同時他還用一個極端案例說明問題：對於使用相同檔案的 1000 個 Task，當每個 Task 在相同檔案使用 1000 個 vma 時，總共會有 100 萬個 vma，並且在 unmap 時無論如何都需要走訪這 100 萬個 vma。雖然他只提到 File-back page，然而既然說是設計本身問題，代表 Anon page 也有可能出現相同問題。</p>
<p>Andrew 當時本人傾向認為這只是「理論上可能發生」，問題不大，畢竟 2.4 的 virtual scan 設計也有相同問題但沒人遇到。然而 7 年後，Andrew morton 擔心的事確實發生了。</p>
<blockquote>
<p>Without the anon_vma changes, when AIM7 hits around 9.7k
users (on a test box with 16GB RAM and not quite enough IO),
the system ends up running &gt;99% in system time, with every
CPU on the same anon_vma lock in the pageout code.</p>
</blockquote>
<p>Rik van Riel 發現 AIM7 Benchmark 當使用者數量到 9.7k 時卡死，並且大部分時間都在搶佔 anon_vma 的鎖上面，這也印證了上面提到的需要花費大量時間在走訪的問題。</p>
<p>有鑑於此，Rik van Riel 針對上述問題提出修改的 PATCH，具體想法為針對各個行程建立一個 <code>anon_vma</code> 並使用 <code>anon_vma_chain</code> 資料結構串連 anon_vma 與 vma，再使用 same_vma 與 <code>same_anon_vma</code> 將映射到相同的「<code>vma</code> 或 <code>anon_vma</code>」的 avc 串連起來，行成多對多的關聯。</p>
<p>應用此 PATCH 後 AIM7 到 29.7k 個使用者才開始卡死，並且瓶頸變為 I/O 等待。</p>
<pre><code>struct anon_vma_chain {
	struct vm_area_struct *vma;
	struct anon_vma *anon_vma;
	struct list_head same_vma; // 所有鏈結到相同 anon_vma 的 avc
	struct list_head same_anon_vma; // 所有鏈結到相同 vma 的 avc
};
</code></pre>
<p>對應核心 commit/patch：</p>
<ul>
<li><code>5beb49305251</code>（<code>mm: change anon_vma linking to fix multi-process server scalability issue</code>）。</li>
</ul>
<h3>anon_vma_chain interval tree</h3>
<p>把 same_anon_vma 鏈結串列換成 interval tree（以 augmented rbtree 實作），以每個 VMA 覆蓋的 $[\text{vm_pgoff}, \text{vm_pgoff} + \text{vma_pages})$ 區間為鍵。RMAP 走訪改為對目標 pgoff 做 stabbing query，只回傳區間真正覆蓋該 pgoff 的 VMA，複雜度 O(log n + 命中數)。同一個 merge window 中，file-back page 這一側行之有年的 prio_tree 也被同一套 interval tree 取代（6b2dbba8b6ac），anon 與 file 的反向走訪自此共用同一種索引結構，也就是今日 <code>anon_vma_interval_tree_foreach()</code> 與 <code>vma_interval_tree_foreach()</code> 巨集的由來。</p>
<pre><code>struct anon_vma_chain {
	struct vm_area_struct *vma;
	struct anon_vma *anon_vma;
	struct list_head same_vma;   /* locked by mmap_lock &amp; page_table_lock */
	struct rb_node rb;			/* locked by anon_vma-&gt;rwsem */
	unsigned long rb_subtree_last;
#ifdef CONFIG_DEBUG_VM_RB
	unsigned long cached_vma_start, cached_vma_last;
#endif
};
</code></pre>
<p>RMAP 走訪時，首先從 Page-&gt;mapping 獲取 anon_vma，接著從 anon_vma-&gt;rb_root 持續走訪 anon_vma_chain interval tree 檢查對應的 vma 的 vm_start 與 vm_end 判斷這個 vma 對應的 pte 是否 mapping 到這個 Page。</p>
<p>對應核心 commit：</p>
<ul>
<li><code>bf181b9f9d8d</code>（<code>mm anon rmap: replace same_anon_vma linked list with an interval tree</code>）</li>
</ul>
<pre><code>digraph anon_vma_chain {
    rankdir=LR;
    bgcolor="transparent";
    nodesep=0.5;
    ranksep=1.0;
    node [shape=record, fontname="Courier New", fontsize=11,
          color="#555555", fontcolor="#333333", margin="0.16,0.06"];
    edge [fontname="Courier New", fontsize=10, arrowsize=0.7];

    subgraph cluster_vp {
        color="transparent"; fontname="Courier New"; fontcolor="#333333";
        label="vm_area_struct (parent)";
        vma_p [width=2.3, label="vm_start / vm_end|&lt;avc&gt; anon_vma_chain|&lt;av&gt; anon_vma"];
    }
    subgraph cluster_vc {
        color="transparent"; fontname="Courier New"; fontcolor="#333333";
        label="vm_area_struct (child)";
        vma_c [width=2.3, label="vm_start / vm_end|&lt;avc&gt; anon_vma_chain|&lt;av&gt; anon_vma"];
    }

    subgraph cluster_ap1 {
        color="transparent"; fontname="Courier New"; fontcolor="#333333";
        label="anon_vma_chain";
        avc_p1 [width=2.3, label="&lt;vma&gt; vma|&lt;av&gt; anon_vma|&lt;sv&gt; same_vma|&lt;rb&gt; rb|rb_subtree_last"];
    }
    subgraph cluster_ac1 {
        color="transparent"; fontname="Courier New"; fontcolor="#333333";
        label="anon_vma_chain";
        avc_c1 [width=2.3, label="&lt;vma&gt; vma|&lt;av&gt; anon_vma|&lt;sv&gt; same_vma|&lt;rb&gt; rb|rb_subtree_last"];
    }
    subgraph cluster_ac2 {
        color="transparent"; fontname="Courier New"; fontcolor="#333333";
        label="anon_vma_chain";
        avc_c2 [width=2.3, label="&lt;vma&gt; vma|&lt;av&gt; anon_vma|&lt;sv&gt; same_vma|&lt;rb&gt; rb|rb_subtree_last"];
    }

    subgraph cluster_ava {
        color="transparent"; fontname="Courier New"; fontcolor="#333333";
        label="anon_vma A";
        av_a [width=2.3, label="&lt;root&gt; root|&lt;parent&gt; parent|num_children|num_active_vmas|&lt;rb&gt; rb_root"];
    }
    subgraph cluster_avb {
        color="transparent"; fontname="Courier New"; fontcolor="#333333";
        label="anon_vma B";
        av_b [width=2.3, label="&lt;root&gt; root|&lt;parent&gt; parent|num_children|num_active_vmas|&lt;rb&gt; rb_root"];
    }

    av_a -&gt; av_b [style=invis];

    /* same_vma：從 VMA 看「我要照顧哪些 anon_vma」 */
    edge [color="#333333", style=solid, penwidth=1.3, constraint=true, dir=forward];
    vma_p:avc -&gt; avc_p1:sv;
    vma_c:avc -&gt; avc_c1:sv;
    avc_c1:sv -&gt; avc_c2:sv;

    /* rb：從 anon_vma 看「哪些 VMA 覆蓋我」（interval tree） */
    edge [color="#1f6feb", style=dashed, penwidth=1.2, dir=back, constraint=false];
    avc_p1:rb -&gt; av_a:rb;
    avc_c1:rb -&gt; av_a:rb;
    avc_c2:rb -&gt; av_b:rb;

    /* AVC 自身兩個指標 */
    edge [color="#999999", style=dotted, penwidth=1.0, dir=back, constraint=true];
    vma_p -&gt; avc_p1:vma;
    vma_c -&gt; avc_c1:vma;
    vma_c -&gt; avc_c2:vma;
    edge [dir=forward, constraint=true];
    avc_p1:av -&gt; av_a;
    avc_c1:av -&gt; av_a;
    avc_c2:av -&gt; av_b;

    /* VMA 自己的 -&gt;anon_vma：新頁面掛這裡 */
    edge [color="#a15c00", style=solid, penwidth=1.1, constraint=false];
    vma_p:av -&gt; av_a:root;
    vma_c:av -&gt; av_b:root;

    /* anon_vma tree */
    edge [color="#999999", style=dotted, penwidth=1.0, constraint=false];
    av_b:parent -&gt; av_a:root [label=" parent / root"];
}
</code></pre>
<h2>RMAP 與現有 Page reclaim 實作的關聯</h2>
<p>當 Major Fault 處理中發現可用 Page 容量小於某種程度時會啟動 Page reclaim 機制，該機制在可用記憶體低於 <code>WMARK_LOW</code> 時觸發 <code>kswapd</code> 或直接由 page fault handler 在可用記憶體低於 <code>WMARK_MIN</code> 時進行 direct reclaim。回收時會根據 page 屬於的 LRU 層級，從 cold 資料優先選擇 victim 進行 reclaim。</p>
<p>不管是 direct reclaim 還是 kswapd 都會呼叫到 <code>shrink_node()</code></p>
<pre><code># 背景回收
kswapd -&gt; balance_pgdat -&gt; shrink_node -&gt; shrink_lruvec
  -&gt; shrink_folio_list -&gt; {folio_referenced, try_to_unmap} -&gt; __rmap_walk_file ...

# direct reclaim
__alloc_pages -&gt; __alloc_pages_slowpath -&gt; try_to_free_pages
  -&gt; shrink_node -&gt; shrink_lruvec -&gt; ...
</code></pre>
<h3>觀察 Active/Inactive List 如何使用 RMAP</h3>
<p><img src="/images/screenshot/h9TKwHMEQ_-nkUGJqdVWdA-04-HJCafU2UGl-6feee39f.png" alt="image" /></p>
<p>傳統 Active/Inactive list 的存取偵測完全建立在 RMAP 上。核心無法在硬體設定 Accessed bit 的當下得到通知，只能事後輪詢：folio_referenced() 對 folio 做一次 RMAP 走訪，逐一檢查並清除所有映射 PTE 的 Accessed bit，回傳「自上次檢查以來被幾個 VMA 存取」。</p>
<p>具體來說會有兩個路徑會進行 RMAP 走訪</p>
<ol>
<li>Demotion 時檢查 Active LRU list 的尾端 folio 有沒有被存取過，如果沒有就被移到 inactive list</li>
<li>Eviction 時檢查 Inactive LRU list 的尾端 folio 有沒有被存取過，如果沒有就把這個 Folio 丟棄，否則重新移回 Inactive list</li>
</ol>
<p>以 <code>kswapd</code> 為例，其呼叫 RMAP 的路徑為：</p>
<pre><code>kswapd -&gt; balance_pgdat -&gt; shrink_node -&gt; shrink_lruvec
  ├── shrink_active_list
  │    └── folio_referenced -&gt; __rmap_walk_file
  │         ├── folio_referenced_one -&gt; page_vma_mapped_walk
  │         └── vma_interval_tree_iter_first
  └── shrink_folio_list
       ├── folio_referenced -&gt; __rmap_walk_file -&gt; folio_referenced_one
       │        └── page_vma_mapped_walk
       └── try_to_unmap -&gt; __rmap_walk_file -&gt; try_to_unmap_one
                └── set_tlb_ubc_flush_pending
</code></pre>
<h3>MGLRU 如何減少 RMAP 開銷</h3>
<h4>架構改進</h4>
<p>首先，從架構層面來說，Active/Inactive List 在 eviction 的時候需要同時對 active 與 inactive LRU List 操作，而 MGLRU 由於其 Generation 自然老化的特性，因此在 eviction 時只須針對最老的 generation (min_seq) 操作。</p>
<p><img src="/images/screenshot/h9TKwHMEQ_-nkUGJqdVWdA-05-SkX_XU3UMg-a2e3fedf.png" alt="mglru_list" /></p>
<pre><code>kswapd -&gt; balance_pgdat -&gt; kswapd_shrink_node -&gt; shrink_node
└── lru_gen_shrink_node
    └── shrink_one（global）／shrink_many -&gt; shrink_one（memcg）
        └── try_to_shrink_lruvec -&gt; evict_folios
            └── shrink_folio_list
                ├── folio_check_references -&gt; folio_referenced
                │   └── rmap_walk -&gt; rmap_walk_anon／rmap_walk_file
                │       └── folio_referenced_one
                │           └── page_vma_mapped_walk        # 固定成本在這之前全數付清
                │               └── lru_gen_look_around     # 邊際成本近零的 64-PTE 視窗
                │                   ├── get_pte_pfn / get_pfn_folio
                │                   ├── walk_update_folio   # 鄰居就地升代
                │                   └── update_bloom_filter # 回饋給 aging
                └── try_to_unmap -&gt; rmap_walk -&gt; try_to_unmap_one
</code></pre>
<p>接著來看 RMAP 走訪的成本結構。folio_referenced() 為了檢查一個 PTE 的 Accessed bit，固定要付：取得 vma object lock、interval tree 走訪、page_vma_mapped_walk() 逐層下降 Page table 定位 PTE、取得 page table lock（PTL）。而 LRU 依實體頁組織，串列上相鄰 folio 來自各 process 的不同 VMA。因此每次走訪都是一組毫無快取重用的鎖與樹操作。固定成本高、又完全不均攤，這就是為什麼 page_vma_mapped_walk 吃掉 kswapd 18.47% CPU。</p>
<pre><code>    patch1-6
      39.03%  lzo1x_1_do_compress (real work)
      18.47%  page_vma_mapped_walk (overhead)
       6.74%  _raw_spin_unlock_irq
       3.97%  do_raw_spin_lock
       2.49%  ptep_clear_flush
       2.48%  anon_vma_interval_tree_iter_first
       1.92%  folio_referenced_one
       1.88%  __zram_bvec_write
       1.48%  memmove
       1.31%  vma_interval_tree_iter_next

    patch1-7
      48.16%  lzo1x_1_do_compress (real work)
       8.20%  page_vma_mapped_walk (overhead)
       7.06%  _raw_spin_unlock_irq
       2.92%  ptep_clear_flush
       2.53%  __zram_bvec_write
       2.11%  do_raw_spin_lock
       2.02%  memmove
       1.93%  lru_gen_look_around
       1.56%  free_unref_page_list
       1.40%  memset
</code></pre>
<p>因此 <code>lru_gen_look_around()</code> 利用記憶體的空間局部性來改善頁面回收與熱頁面識別，當 <code>shrink_folio_list</code> 找到一個 Hot PTE (Accessed Bit = 1) 時以該 PTE 位址為中心劃出一個 PMD scan window，在其中搜尋總共 BITS_PER_LONG 個 PTE，檢查這些鄰近 PTE 的 Access bit 是否也為 1 (young) 並在足夠多 Hot page 時將 PMD 加入 Bloom filter 以在 Aging 時作為輔助判斷資訊。</p>
<p>$$f(young, total) = young \times n \ge total$$
$n=clamp(cacheline\div sizeof(pte),2,8)$</p>
<p>最後是 Aging 部份，前面講到當 PMD 中包含足夠多 Hot page 時就會將 PMD 加入 Bloom filter，在 Aging 進行 Page Table 走訪時，會先對每個 PMD entry 查詢 Bloom Filter。如果該 PMD 存在於 Bloom filter，表示該 PMD 的 Hot page 密度足夠高，值得繼續走訪裡面的 PTE 並進行 Promote/Protect。</p>
<h3>Reclaim 行為</h3>
<p><img src="/images/screenshot/h9TKwHMEQ_-nkUGJqdVWdA-06-ryB_kL3Ifx-eb962fa5.png" alt="image" /></p>
<ul>
<li>cgroup memory.reclaim
<ul>
<li>主動式，手動觸發</li>
<li><code>echo &lt;size&gt; &gt; /sys/fs/cgroup/&lt;cg-name&gt;/memory.reclaim</code></li>
</ul>
</li>
<li>direct reclaim
<ul>
<li>反應式，觸發於可用記憶體極度缺乏（水位低於 WMARK_MIN）</li>
<li>同步執行，Page fault 時檢查記憶體水位</li>
<li>水位提昇至 WMARK_LOW 後停止</li>
</ul>
</li>
<li>kswapd
<ul>
<li>可用記憶體水位低於 WMARK_LOW 觸發</li>
<li>背景執行，在 WMARK_HIGH 時停止</li>
</ul>
</li>
</ul>
<h2>雲端公司如何自訂 Reclaim 策略</h2>
<ul>
<li>Why? Kernel 的 Reclaim Policy 主要考慮 General case，雲端廠商發現在特定 Workload 導致 Regression，因此雲端廠商需要自己實作 Reclaim 的 Policy 來符合需求</li>
</ul>
<h3>Google：kstaled / Kreclaimd (ASPLOS 2019)</h3>
<p><img src="/images/screenshot/h9TKwHMEQ_-nkUGJqdVWdA-07-HkBg4IhIMx-1df97116.png" alt="image" /></p>
<ul>
<li>kstaled：週期性走訪 Page table 讀取 Page 的 Accessed bit 以追蹤 Page age</li>
<li>kreclaimd：將 Page age 超過門檻的 page swap out (壓縮到 Zswap)</li>
<li>架構發展：
<ol>
<li>sysfs + bitmap</li>
<li>kstaled / kreclaimd</li>
</ol>
</li>
<li>Overhead 隨記憶體大小與掃描頻率線性成長
<ul>
<li>kstaled 掃描改為 PMD linked list 走訪 (降低 3.5 倍 CPU 使用)</li>
<li>kreclaimd 改為接收 kstaled 資料</li>
</ul>
</li>
</ul>
<h4>LSF MM 19</h4>
<p>考慮這個 Reclaim 策略無法在 Userspace 處理，因此由 Shakeel Butt 主導，在 LSF MM 19 上提議將這個 Reclaim 策略推到 Upstream</p>
<ul>
<li>社群發言與提問
<ul>
<li>Rik van Riel：即使效能確實改善，仍存在 Scalability 問題</li>
<li>與會者：為什麼不直接用 kswapd？</li>
</ul>
<blockquote>
<p>It "kind of works", he said, but is based on watermarks (keeping a certain percentage of memory free) rather than on idleness. kswapd also tries to balance memory usage across NUMA nodes, which is not useful in this setting. Finally, Butt said, kswapd is built on a large set of complicated heuristics, and he doesn't want to try to change them.</p>
</blockquote>
<ul>
<li>Johannes Weiner：為何重作 LRU List 在做的事，成本還高得離譜？</li>
</ul>
<blockquote>
<p>Google was willing to pay that cost, which was less than having the system go into direct reclaim.</p>
</blockquote>
</li>
</ul>
<p>社群共識：這類 proactive reclaim 確實對不少使用者有用，但這個特定解法的成本太高，不值得考慮合併進 upstream。</p>
<h3>DAMON/S (Data Access MONitoring[-based operation Schemes])</h3>
<ul>
<li>By SeongJae Park (sjp38)，前 Amazon 員工
<img src="/images/screenshot/h9TKwHMEQ_-nkUGJqdVWdA-08-BJqw4P3Lzg-3df2c212.png" alt="image" /></li>
<li>Region-based sampling
<ul>
<li>將監測粒度從 Google 上面架構的 Page 改為 Region (可自訂 Region 大小)</li>
<li>使用抽樣法觀測 Region 熱度</li>
<li>每次取樣在每個 region 內隨機挑一個 Page，等一個 interval 後檢查它是否被存取，命中就把該 region 的 nr_accesses 加 1。</li>
</ul>
</li>
<li>Adaptive Regions Adjustment
<ul>
<li>前提是同一 region 內頁面熱度相近，而存取模式會變，所以 DAMON 依存取頻率自動合併與分裂 region，持續維持這個前提。</li>
</ul>
</li>
<li>可基於觀測到資訊設計 reclaim 策略（DAMOS）
<ul>
<li>Example: DAMON_RECLAIM</li>
</ul>
</li>
</ul>
<h2>結論</h2>
<ul>
<li>RMAP 架構改善圍繞於掃描 Page table 成本</li>
<li>MGLRU 將 RMAP 走訪的整體 Overhead 分攤至各部分，並透過單次 RMAP 走訪成本換取較少 RMAP 走訪次數</li>
</ul>
<hr />
]]></content>
    <author><name>c8763yee</name></author>
    <category term="研討會"/>
  </entry>
  <entry>
    <title>帶你深入淺出 Git 版本控制實戰</title>
    <link href="https://c8763yee.github.io/posts/%E5%B8%B6%E4%BD%A0%E6%B7%B1%E5%85%A5%E6%B7%BA%E5%87%BA-git-%E7%89%88%E6%9C%AC%E6%8E%A7%E5%88%B6%E5%AF%A6%E6%88%B0/" rel="alternate" type="text/html"/>
    <id>https://c8763yee.github.io/posts/%E5%B8%B6%E4%BD%A0%E6%B7%B1%E5%85%A5%E6%B7%BA%E5%87%BA-git-%E7%89%88%E6%9C%AC%E6%8E%A7%E5%88%B6%E5%AF%A6%E6%88%B0/</id>
    <published>2026-01-28T17:56:05.000Z</published>
    <updated>2026-01-28T17:56:05.000Z</updated>
    <summary>NUTC IMAC Git 課程講義：從版本控制概念、安裝與本地操作，到 SSH 金鑰、遠端協作與 Git Flow 等分支策略。</summary>
    <content type="html"><![CDATA[<h1>帶你深入淺出 Git 版本控制實戰</h1>
<p>課程連結： <img src="https://hackmd.io/_uploads/HJCgML9PA.png" alt="image" /></p>
<h2>1. 版本控制是什麼？為什麼要做版本控制</h2>
<p>版本控制是一種管理軟體開發過程中對 code 變更的技術。它允許開發者跟蹤和管理程式碼的歷史變更，協作開發，並且可以在需要時恢復到先前的版本。</p>
<p>很多人作版本控制的方法是把檔案複製到另一個目錄（如果他們夠聰明的話，他們還會幫資料夾加上時間）。這種做法很常見，因為這樣做很簡單，但是卻也非常容易產生離譜的錯誤。這種做法非常容易搞混資料夾，意外寫錯檔案或複製覆蓋到不想要的檔案。</p>
<p>而透過「版本控制系統」可以清楚的記錄每個檔案是誰在什麼時候加進來、什麼時候被修改或刪除。Git 就是一種版本控制系統，也是目前業界最流行的版本控制系統，沒有之一。</p>
<p>出社會工作，有 Git 幫你保留這些歷史紀錄跟證據，萬一出事的時候你就能知道是從什麼時候開始就有問題，以及知道該找誰負責，再也不用自己背黑鍋了！</p>
<h2>2. 事前準備</h2>
<ol>
<li>一臺電腦</li>
<li>註冊 GitHub 帳號</li>
<li>檢查電腦是否已安裝 Git</li>
</ol>
<pre><code># Windows可以使用where來確定指令是否可用
where git

# Linux與macOS則可以使用which或command -v來檢查
which git
# 或者
command -v git
</code></pre>
<h2>3. 安裝 Git</h2>
<ul>
<li>進入<a href="https://git-scm.com/downloads">Git 官網的下載頁面(https://git-scm.com/downloads)</a>後選擇自己的作業系統
<img src="https://hackmd.io/_uploads/H1kvGvKUR.png" alt="image" /></li>
</ul>
<h3>Windows</h3>
<p><img src="https://hackmd.io/_uploads/B1NrzDYUA.png" alt="image" /></p>
<ul>
<li>下載完開啟安裝檔後一直按 Next 就行</li>
</ul>
<blockquote>
<p>看到這個頁面就代表安裝成功了<img src="https://hackmd.io/_uploads/Bksfg3Jv0.png" alt="image" /></p>
</blockquote>
<h3>Linux/macOS</h3>
<ul>
<li>macOS 與 Linux 則需要使用指令安裝</li>
</ul>
<pre><code># macOS
brew install git

# Linux
# 針對各種系統發行版與套件管理器有不同的安裝方式

# apt(Ubuntu/Debian/Linux mint)
sudo apt install git -y 

# pacman(Arch Linux)
sudo pacman -S git --noconfirm

# Fedora
sudo yum install git -y
# fedora 22之後需使用下面指令
sudo dnf install git 
</code></pre>
<blockquote>
<pre><code># 快速查看自己使用的Linux系統發行版: 
# cat /etc/os-release | grep "^PRETTY_NAME="| cut -d'=' -f2
</code></pre>
</blockquote>
<h2>4. 基礎概念</h2>
<p><img src="https://hackmd.io/_uploads/ryY3kSSuh.png" alt="" />
Git 主要分為 4 個區塊及 4 種狀態</p>
<h3>Git 區塊</h3>
<ul>
<li><strong>Working Directory (在此簡稱：W)</strong>：現在存在於資料夾內的、編輯器可以打開的位置。</li>
<li><strong>Staging Area (在此簡稱：S)</strong>：暫存狀態。</li>
<li><strong>Local Repository (在此簡稱：L)</strong>：本地（自己的電腦上的）倉庫。</li>
<li><strong>Remote Repository (在此簡稱：R)</strong>：遠端（不在自己的電腦上的）倉庫。</li>
</ul>
<h3>Git 狀態</h3>
<ul>
<li><strong>Untracked</strong>：未被追蹤。</li>
<li><strong>Unmodified</strong>：追蹤中，未修改。</li>
<li><strong>Modified</strong>：追蹤中，已修改。</li>
<li><strong>Staged</strong>：追蹤中，待提交。</li>
</ul>
<p>&lt;!-- Working Directory 和 Remote Repository 分別代表手上電腦編輯器開啟的檔案及遠端 GitHub 頁面上看到的檔案。</p>
<p>Staging Area 是本地端暫存的檔案，檔案需要先被加入追蹤，才有資格進入 Staging Area ，而沒被加入的檔案就是 Untracked 狀態。</p>
<p>Staging Area 內的檔案狀態與 Working Directory 的狀態一致（沒有編輯過）時，為 Unmodified 狀態；若狀態不一致（編輯過），則為 Modified 狀態。已存在於 Staging Area 檔案的狀態為 Staged 狀態。</p>
<p>Local Repository 就是在本地端的倉庫。可以理解為存在於本地的 GitHub。 --&gt;</p>
<h2>開始使用</h2>
<h3>本地設定</h3>
<h4>相關指令</h4>
<ul>
<li>
<p><code>git -h</code>：顯示 Git 的幫助訊息</p>
<ul>
<li><code>git [指令] -h</code>：顯示特定 Git 指令的幫助訊息</li>
</ul>
</li>
<li>
<p><code>git init</code>：在當前目錄下建立一個<code>.git</code>的隱藏資料夾用來儲存 Git 的相關資訊</p>
<ul>
<li>其他選項</li>
</ul>
<pre><code>git init &lt;資料夾名稱&gt;    # 在指定的資料夾下建立Git倉庫
git init -b &lt;分支名稱&gt;    # 初始化時同時將預設分支設定為指定的分支名稱
</code></pre>
<p>:::warning
&lt;font size=80&gt;注意!!!!!&lt;/font&gt;
在初始化 Git 後，我們需要先設定使用者名稱與 email，這樣除了可以讓 Git 知道是誰在使用，也可以讓其他人知道是誰做了這個 commit。</p>
<pre><code># 這邊的`--global`代表全域設定，也就是說這個設定會套用到所有的Git專案
# 如果只想要套用到特定的專案，可以將`--global`拿掉。
git config --global user.name &lt;你的名稱&gt;
git config --global user.email &lt;你的email&gt;
</code></pre>
<p>設定完之後，就可以真正開始使用 Git 了。
:::</p>
</li>
<li>
<p><code>git add &lt;檔案名稱&gt;</code>：將檔案加入 Staging Area</p>
<ul>
<li>一次可以加入多個檔案，也可以使用<code>git add .</code>將目前資料夾下的所有檔案加入</li>
<li>其他選項</li>
</ul>
<pre><code>git add -A          # 將所有檔案加入
git add -u          # 將已經被追蹤的檔案加入
git add -f          # 強制加入檔案
</code></pre>
</li>
<li>
<p><code>git commit -m &lt;訊息&gt;</code>：將 Staging Area 的檔案提交到 Local Repository</p>
<ul>
<li><code>-m</code>後面的訊息是這次提交的訊息，可以讓其他人知道這次提交的目的</li>
<li>也可以不加<code>-m</code>，這樣會進入一個編輯器讓你輸入訊息</li>
<li>其他選項</li>
</ul>
<pre><code>git commit -a -m &lt;訊息&gt;  # 將所有已經被追蹤的檔案加入Staging Area並提交
git commit --amend -m &lt;訊息&gt; # 修改上一次的commit訊息
</code></pre>
</li>
<li>
<p><code>git status</code>：檢視目前 Local Repository 與 Staging Area 的狀態</p>
<ul>
<li>會顯示目前有哪些檔案在 Untracked、Modified、Staged 等狀態</li>
</ul>
</li>
<li>
<p><code>git diff</code>：檢視與上一版本之差異。</p>
</li>
<li>
<p><code>git reset &lt;檔案名稱&gt;</code>：將檔案從 Staging Area 移除</p>
<ul>
<li>預設會將指定的檔案從 Staging Area 移除，但不會影響 Working Directory</li>
<li>其他選項</li>
</ul>
<pre><code>git reset HEAD           # 將所有在Staging Area的檔案移除
git reset --hard         # 將所有在Staging Area的檔案移除並且捨棄Working Directory的修改
</code></pre>
</li>
</ul>
<h2>遠端操作</h2>
<p>在講解遠端操作前，我們需要先設定好遠端倉庫的 SSH Key，這樣才能夠透過 SSH 的方式連線到遠端倉庫。</p>
<h3>建立 SSH Key</h3>
<pre><code>ssh-keygen -t ed25519 -C "&lt;你的email&gt;"
# 或者，如果你的電腦不支援ed25519
ssh-keygen -t rsa -b 4096 -C "&lt;你的email&gt;"

# 輸入 keys 檔案要放的位置與名稱，沒有要改就 Enter
&gt; Enter file in which to save the key (/home/&lt;user&gt;/.ssh/id_ed25519):

# 設定通行密碼，沒有要改就 Enter
&gt; Enter passphrase

# 再輸入一次通行密碼，沒有一樣 Enter 就好
&gt; Enter same passphrase again:
</code></pre>
<ul>
<li>接著輸入指令或用記事本打開公鑰。</li>
</ul>
<pre><code>cat ~/.ssh/id_ed25519.pub
# 或者
notepad ~/.ssh/id_ed25519.pub
</code></pre>
<ul>
<li>複製公鑰內容，並且將公鑰加入到遠端儲存庫的 SSH Key 設定中(以 GitHub 為例)
<ul>
<li>進入 GitHub 的設定頁面
<img src="https://hackmd.io/_uploads/H197l6cU0.png" alt="image" /></li>
<li>選擇<code>SSH and GPG keys</code>
<img src="https://hackmd.io/_uploads/SJbdxT5LC.png" alt="image" /></li>
<li>按下<code>New SSH Key</code>
<img src="https://hackmd.io/_uploads/rJF9x65UC.png" alt="image" /></li>
<li>在<code>Title</code>中輸入自己取的 SSH Key 名稱，然後在<code>key</code>輸入剛才的 SSH 公鑰。最後按下<code>Add SSH Key</code>就完成了
<img src="https://hackmd.io/_uploads/HkOogaq8C.png" alt="image" /></li>
</ul>
</li>
</ul>
<h3>遠端相關指令</h3>
<ul>
<li>
<p><code>git remote</code>：檢視目前有哪些遠端倉庫</p>
<ul>
<li>顯示目前有哪些遠端倉庫，並且會標示預設的遠端倉庫</li>
<li>其他選項</li>
</ul>
<pre><code>git remote add &lt;遠端倉庫名稱&gt; &lt;遠端倉庫網址&gt;  # 新增一個遠端倉庫
git remote remove &lt;遠端倉庫名稱&gt;  # 移除一個遠端倉庫
git remote set-url &lt;遠端倉庫名稱&gt; &lt;遠端倉庫網址&gt;  # 修改遠端倉庫的網址
git remote -v  # 顯示遠端倉庫與網址
git remote rename &lt;舊遠端倉庫名稱&gt; &lt;新遠端倉庫名稱&gt;  # 修改遠端倉庫的名稱
</code></pre>
</li>
<li>
<p><code>git branch</code>：檢視目前有哪些分支</p>
<ul>
<li>會顯示目前有哪些分支，並且會標示目前所在的分支</li>
<li>其他選項</li>
</ul>
<pre><code>git branch &lt;分支名稱&gt;    # 建立一個新的分支
git branch -d &lt;分支名稱&gt; # 刪除一個分支
</code></pre>
</li>
<li>
<p><code>git checkout &lt;分支名稱&gt;</code>：切換到指定的分支</p>
<ul>
<li>其他選項</li>
</ul>
<pre><code>git checkout -b &lt;分支名稱&gt; # 建立一個新的分支(如果該分支不存在)並切換到該分支
git checkout -- &lt;檔案名稱&gt; # 捨棄對檔案的修改
</code></pre>
</li>
<li>
<p><code>git push &lt;遠端倉庫名稱&gt; &lt;分支名稱&gt;</code>：將 Local Repository 的分支推送到遠端儲存庫</p>
<ul>
<li>將 Local Repository 的分支推送到遠端儲存庫</li>
<li>其他選項</li>
</ul>
<pre><code>git push -u &lt;遠端倉庫名稱&gt; &lt;分支名稱&gt;  # 設定預設推送的遠端倉庫與分支
</code></pre>
</li>
<li>
<p><code>git clone &lt;遠端倉庫網址&gt;</code>：複製一份遠端倉庫到本地</p>
<ul>
<li>在當前目錄下建立一個資料夾，資料夾名稱就是遠端倉庫的名稱</li>
<li>其他選項</li>
</ul>
<pre><code>git clone &lt;遠端倉庫網址&gt; &lt;目標資料夾路徑&gt;  # 指定複製到指定位置
</code></pre>
</li>
<li>
<p><code>git pull &lt;遠端倉庫名稱&gt; &lt;分支名稱&gt;</code>：從遠端儲存庫拉取分支</p>
<ul>
<li>將遠端儲存庫的分支拉取到 Local Repository</li>
<li>其他選項</li>
</ul>
<pre><code>git pull  # 從預設遠端倉庫拉取分支
git pull --rebase  # 使用rebase方式拉取分支
</code></pre>
</li>
</ul>
<h1>5. 協作流程</h1>
<h2>Git Flow</h2>
<p><img src="https://hackmd.io/_uploads/Sy8SIXQKn.png" alt="" /></p>
<ul>
<li>特點：
<ul>
<li>不同分支，不同功能。</li>
</ul>
</li>
<li>優點：
<ul>
<li>流程清晰可控</li>
</ul>
</li>
<li>缺點：
<ul>
<li>需要同時維護 main/master 分支與 delevop 分支兩個長期分支</li>
<li>對於中小型專案來說過於複雜且管理分支對初學者或新團隊來說會提高負擔</li>
</ul>
</li>
</ul>
<h2>GitHub Flow</h2>
<p><img src="https://hackmd.io/_uploads/B1m58Q7F2.png" alt="" /></p>
<ul>
<li>特點：
<ul>
<li>簡化版的 Git Flow</li>
<li>Pull Request(PR)</li>
</ul>
</li>
</ul>
<ul>
<li>優點：
<ul>
<li>只有一個長期分支 - main/master 分支</li>
</ul>
</li>
<li>缺點：
<ul>
<li>正式環境更容易出問題</li>
<li>在沒有適當測試和健全的 CI/CD、代碼審核……等過程下更容易發布問題到生產環境。</li>
</ul>
</li>
</ul>
<h2>GitLab Flow</h2>
<p>1.持續部署
<img src="https://hackmd.io/_uploads/rySiIm7Fn.png" alt="" />
2.版本發布
<img src="https://hackmd.io/_uploads/B1G6I77Y2.png" alt="" /></p>
<p>特點：</p>
<ul>
<li>upstream first(只有 main/master 作為主要分支)</li>
</ul>
<h2>有興趣自己可以去瞭解的知識</h2>
<h3>指令類</h3>
<ul>
<li>git blame</li>
<li>git rebase</li>
<li>git cherry-pick</li>
<li>git merge</li>
</ul>
<h3>其他</h3>
<ul>
<li>commit message 規範</li>
<li>如何發 pull request</li>
</ul>
<h1>作業</h1>
<p><img src="https://hackmd.io/_uploads/B1b-A75wA.png" alt="image" /></p>
<ol>
<li><a href="https://github.com/c8763yee/git-tutorial.git">複製（Fork）這個 repo(https://github.com/c8763yee/git-lec)</a>到自己的Github，然後Clone到自己的電腦</li>
<li>在 shared 資料夾將以下的 code 儲存並命名為自己的學號後 push 到自己剛才 Fork 的 GitHub Repo</li>
</ol>
<pre><code>#!/bin/bash
echo 'helloworld'
</code></pre>
<ol>
<li>（可做可不做）發一個 Pull Request 到上面的 repo 並且在留言區中寫上自己的名字與學號</li>
</ol>
<h1>表單連結</h1>
<p><img src="https://hackmd.io/_uploads/H1F1f49PA.png" alt="image" /></p>
]]></content>
    <author><name>c8763yee</name></author>
    <category term="教學文章"/>
  </entry>
  <entry>
    <title>Build Linux kernel</title>
    <link href="https://c8763yee.github.io/posts/build-linux-kernel/" rel="alternate" type="text/html"/>
    <id>https://c8763yee.github.io/posts/build-linux-kernel/</id>
    <published>2025-12-10T00:00:00.000Z</published>
    <updated>2025-12-10T00:00:00.000Z</updated>
    <summary>Build and configure a Linux kernel from source, including debugging-oriented menuconfig options, compilation, installation, and development setup.</summary>
    <content type="html"><![CDATA[<h1>Build Linux kernel</h1>
<h2>download kernel</h2>
<pre><code>if [[ $(echo $VERSION | cut -d'.' -f3) == '0' ]]; then
    VERSION=$(echo $VERSION| cut -d'.' -f1,2)
fi

# Get the major version number (e.g., '6' from '6.5.3')
MAJOR_VERSION=$(echo "$VERSION" | cut -d'.' -f1)

wget "https://cdn.kernel.org/pub/linux/kernel/v${MAJOR_VERSION}.x/linux-${VERSION}.tar.xz"

tar -xf "linux-${VERSION}.tar.xz" 
</code></pre>
<h2>menuconfig for debug</h2>
<pre><code>make mrproper &amp;&amp; make menuconfig
</code></pre>
<p>:::info
TODO: Add variable name (CONFIG_&lt;smth&gt;) for each options
:::</p>
<h3>Kernel hacking</h3>
<h4>printk and dmesg options</h4>
<ul>
<li>[X] Enable core function if dynamic debug support</li>
<li>[X] Enable dynamic <code>printk()</code> support</li>
</ul>
<h4>Compile-time checks and compiler options</h4>
<ul>
<li>[X] Provide GDB scripts for kernel debugging (<code>CONFIG_GDB_SCRIPTS</code>)</li>
<li>[X] Generate readable assembler code (<code>CONFIG_READABLE_ASM</code>)</li>
<li>[X] one of <code>Debug information</code></li>
<li>[X] Enable full Section mismatch analysis
(IMPORTANT FOR DEBUGGING FUNCTION LIKE <code>handle_pte_fault</code>)</li>
</ul>
<h3>Memory Management options</h3>
<ul>
<li>[X] Multi-Gen LRU(all selected)</li>
<li>[x] Enable <code>userfaultfd()</code> system call</li>
</ul>
<h2>Build linux kernel and boot using QEMU</h2>
<p>build linux kernel</p>
<pre><code>export CC='ccache gcc'
export HOSTCC='ccache gcc' 

make all -j$(nproc)
make scripts_gdb
</code></pre>
<ul>
<li>if you want to boot new kernel in PC</li>
</ul>
<pre><code>export INSTALLKERNEL=installkernel
KERNEL_NAME=smth
PRESET_NAME=smth
</code></pre>
<pre><code>sudo make modules_install -j$(nproc)
sudo make headers_install -j$(nproc)
sudo make install -j$(nproc)
sudo cp arch/x86_64/boot/bzImage /boot/vmlinuz-linux-$KERNEL_NAME

# install dkms
sudo dkms autoinstall -k $(make kernelrelease)

# install initramfs via mkinitcpio
sudo mkinitcpio -p linux-$PRESET_NAME -k $(make kernelrelease)
 
</code></pre>
<h3>Build rootfs via busybox</h3>
<pre><code>git clone https://git.busybox.net/busybox &amp;&amp; cd busybox

# remember to unselect tc in Networking Utilities in menuconfig
# and use static binary (enable in Settings)
make mrproper &amp;&amp; make menuconfig 

make install -j$(nproc)

cd _install
mkdir -p lib lib64 proc sys etc etc/init.d

# write init script 
touch etc/init.d/rcS
chmod +x etc/init.d/rcS
(cat &lt;&lt;EOF
#!/bin/sh
# Mount the /proc and /sys filesystems
mount -t proc none /proc
mount -t sysfs none /sys
mount -t devtmpfs none /dev
mount -t debugfs none /sys/kernel/debug
# Populate /dev
/sbin/mdev -s
EOF
) &gt; etc/init.d/rcS


# pack all busybox file into rootfs via cpio and gzip 
find . | cpio -o --format=newc | gzip &gt; ../../rootfs.gz
</code></pre>
<p>Boot using QEMU</p>
<pre><code>qemu-system-x86_64 \
    -kernel arch/x86_64/boot/bzImage \
    -nographic \
    -initrd rootfs.gz \
    -append "root=/dev/ram rdinit=/sbin/init console=ttyS0"
    # -S -s // add these flag for gdb debug
    
    # add this flag for share directory with host
    # -virtfs local,id=shared,path=shared,mount_tag=shared,security_model=none
</code></pre>
<p>Tracing and debug kernel</p>
<pre><code>gdb vmlinux -ex 'target remote:1234' -ex 'b start_kernel' -ex 'c'
</code></pre>
<h3>Build rootfs via pacstrap</h3>
<pre><code>mkdir rootfs
sudo chown root:root rootfs
sudo pacstrap -c ./rootfs base systemd bash

dd if=/dev/zero of=arch.img bs=1M count=20480
mkfs.ext4 arch.img

mkdir mnt
sudo mount arch.img mnt
sudo cp -a rootfs/. mnt/
sudo umount mnt
</code></pre>
<p>Boot</p>
<pre><code>qemu-system-x86_64 \
    -kernel arch/x86_64/boot/bzImage \
    -nographic \
    -drive file=arch.img,format=raw,if=virtio \
    -m 1G \
    -append "root=/dev/vda rw console=ttyS0"
	# -cpu host -enable-kvm -smp $(nproc)
</code></pre>
]]></content>
    <author><name>c8763yee</name></author>
    <category term="教學"/>
  </entry>
</feed>